
How UVM RAL works?
In short: UVM RAL (Register Abstraction Layer) is a labelled remote control for the registers inside your chip. Your test reads and writes registers by name, like regmodel.uart.baud_div.write(...), and RAL turns each call into the correct bus activity. It also keeps a mirror copy of every register so your checks always know the expected value. This guide covers every part you need: the field/register/block/map hierarchy, the adapter, the predictor and mirror, access policies, reset, frontdoor and backdoor access, memories, built-in test sequences, and how to wire it all into your environment.
A simple way to picture it
Think about the settings menu on your TV. You do not open the TV and poke wires to change the volume. You press a labelled button on a remote, and the TV handles the electronics behind the scenes. UVM RAL is that remote for your design. Each register is a labelled button. When your test presses it, RAL sends the right signals over the bus, so you do not hand-code an address and a data pattern every time.
Two ideas make this work. The address map is the remote’s wiring diagram: it says which button maps to which address. The mirror is a small notepad RAL keeps, where it writes down what each register should hold, so a later read can be checked automatically.
Why teams use RAL
- Readable tests.
regmodel.uart.ctrl.tx_enable.write(...)says what it does; a raw write of32’h4to32’h0008does not. - One place to change. If an address moves, you fix the register model, not every test.
- Automatic checking. The mirror lets RAL compare read data against the expected value for you.
- Reuse. The same model works at block, subsystem, and chip level.
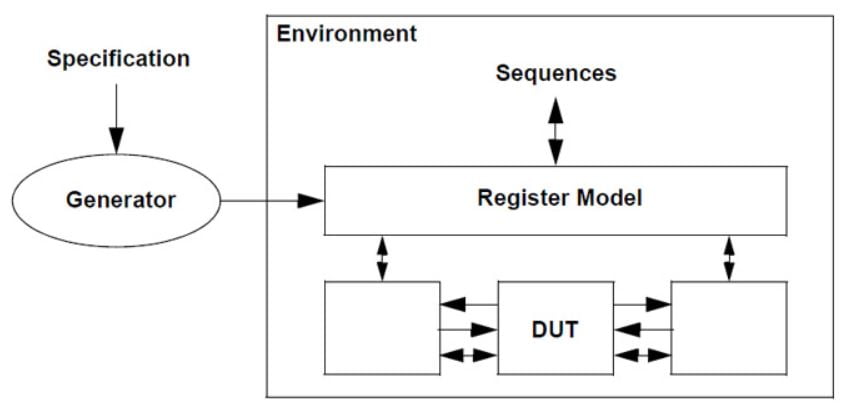
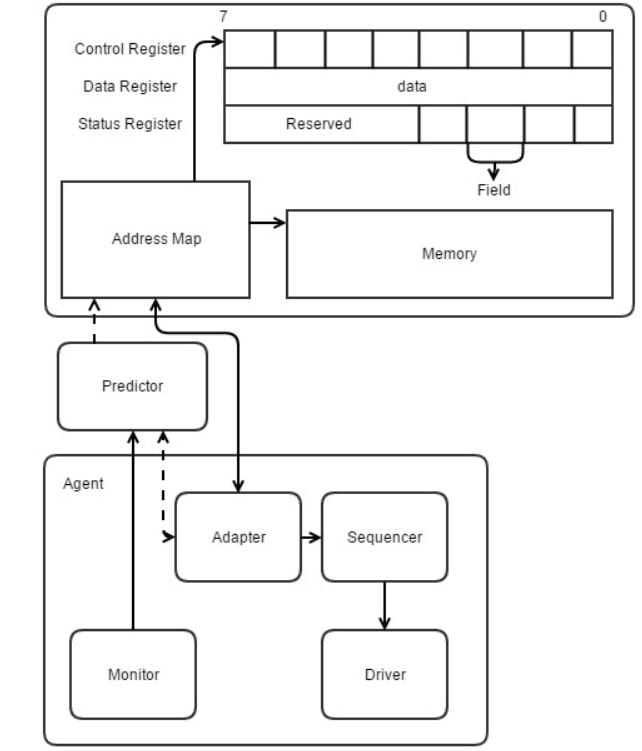
The building blocks: field, register, block and map
A register model is built from four pieces. Understanding each one is the key to reading any RAL code.
Field (uvm_reg_field)
A field is the smallest piece: one or more bits inside a register that mean something on their own, such as a single enable bit or a 2-bit mode. You set its width, bit position, and access policy when you configure() it.
Register (uvm_reg)
A register groups related fields at one address. A 32-bit control register might hold an enable field, a mode field, and some reserved bits. You extend uvm_reg, declare the fields, and build them.
Register block (uvm_reg_block)
A block groups registers that belong together, like all the registers of one UART. A block can also contain other blocks, which is how you scale from a single IP up to a full chip.
Address map (uvm_reg_map)
The map ties each register to an address and an access mode. It also records the bus endianness and, later, connects to the sequencer that drives the real bus. One block can have more than one map, for example a normal map and a secure map.
A real example: a UART control register
Instead of a made-up register, here is one you meet in almost every real design: the control register of a UART. It has a transmit-enable bit, a receive-enable bit, and a 2-bit parity-mode field. The code follows the UVM 1800.2 standard.
// UART control register: models TX_EN, RX_EN and PARITY fields
class uart_ctrl_reg extends uvm_reg;
  `uvm_object_utils(uart_ctrl_reg)

  rand uvm_reg_field tx_en;    // bit 0
  rand uvm_reg_field rx_en;    // bit 1
  rand uvm_reg_field parity;   // bits [3:2]

  function new(string name = "uart_ctrl_reg");
    super.new(name, 32, UVM_NO_COVERAGE); // 32-bit register
  endfunction

  virtual function void build();
    tx_en  = uvm_reg_field::type_id::create("tx_en");
    rx_en  = uvm_reg_field::type_id::create("rx_en");
    parity = uvm_reg_field::type_id::create("parity");

    // configure(parent, size, lsb_pos, access, volatile, reset, has_reset, is_rand, individually_accessible)
    tx_en.configure (this, 1, 0, "RW", 0, 1’b0,  1, 1, 0);
    rx_en.configure (this, 1, 1, "RW", 0, 1’b0,  1, 1, 0);
    parity.configure(this, 2, 2, "RW", 0, 2’b00, 1, 1, 0);
  endfunction
endclass
// Register block: holds the register and its address map
class uart_reg_block extends uvm_reg_block;
`uvm_object_utils(uart_reg_block)
rand uart_ctrl_reg ctrl;
uvm_reg_map reg_map;
function new(string name = "uart_reg_block");
super.new(name, UVM_NO_COVERAGE);
endfunction
virtual function void build();
ctrl = uart_ctrl_reg::type_id::create("ctrl");
ctrl.configure(this);
ctrl.build();
// create_map(name, base_addr, n_bytes, endianness)
reg_map = create_map("reg_map", ’h0, 4, UVM_LITTLE_ENDIAN);
reg_map.add_reg(ctrl, ’h0000, "RW"); // control reg at offset 0x0
lock_model();
endfunction
endclassAccess policies: what a field allows
The access string you pass to configure() tells RAL how a field behaves, so it can predict the right value after every access. The common ones are worth memorising because they show up in almost every specification.
- RW – read and write normally.
- RO – read only; writes are ignored.
- WO – write only; reads return a default.
- W1C – write 1 to clear a bit (very common for interrupt-status bits).
- W1S – write 1 to set.
- RC – the act of reading clears the field.
- WRC – writable, and a read clears it.
| Policy | What it means | Typical use |
|---|---|---|
| RW | Read and write normally | General control and configuration bits |
| RO | Read only; writes are ignored | Status and ID registers |
| WO | Write only; reads return a default | Command or trigger registers |
| W1C | Write 1 to clear a bit | Interrupt status bits |
| W1S | Write 1 to set a bit | Interrupt enable or set registers |
| RC | Reading the field clears it | Self clearing status |
| WRC | Writable, and a read clears it | Mixed status and control |
Getting the policy right matters: if you mark an interrupt-status bit as plain RW when it is really W1C, RAL’s mirror will expect the wrong value and your checks will fail for the wrong reason.
Reset and reset values
Each field is given a reset value when you configure it (the reset and has_reset arguments). After the design is reset, you tell the model with regmodel.reset() so its mirror matches hardware. A hardware-reset test then reads every register and checks it equals its documented default. This is usually the very first register test people run, because it catches wrong addresses and wrong defaults quickly.
Reading and writing in a sequence
Here is a sequence that uses the model. Notice there is no address anywhere; the names do the work.
class uart_ctrl_seq extends uvm_sequence#(uvm_sequence_item);
  `uvm_object_utils(uart_ctrl_seq)

  uart_reg_block regmodel; // handle set by the test

  function new(string name = "uart_ctrl_seq");
    super.new(name);
  endfunction

  virtual task body();
    uvm_status_e   status;
    uvm_reg_data_t rdata;

    // Write the whole register by name
    regmodel.ctrl.write(status, 32’h0000_0003);

    // Read it back; RAL checks against its mirror automatically
    regmodel.ctrl.read(status, rdata);

    // Touch a single field without a raw address
    regmodel.ctrl.parity.write(status, 2’b01);

    // Check the model against hardware for this register
    regmodel.ctrl.mirror(status, UVM_CHECK);
  endtask
endclass
Mirror, desired and actual values
RAL keeps two numbers for every register. The desired value is what you have asked for with your writes. The mirrored value is what RAL believes hardware currently holds. Three methods are easy to mix up:
get()returns the desired value from the model, with no bus activity.read()does a real bus read and updates the mirror with what came back.mirror()does a real read and, withUVM_CHECK, compares it against the expected value for you.
There is also set(), which changes only the desired value in the model, and update(), which writes any registers whose desired value differs from the mirror. Together they let you set up a lot of state in the model and then push it to hardware in one call.
The predictor: keeping the mirror correct
For the mirror to stay right, RAL has to know about every access to the design, even ones your model did not start. There are two ways this happens.
Implicit prediction is the default: when you call read() or write() through the model, RAL updates the mirror itself. Explicit prediction adds a uvm_reg_predictor connected to the bus monitor, so any traffic on the bus, including writes from an embedded CPU or another master, also updates the mirror. Real projects almost always use explicit prediction, because it keeps the model honest even when the test is not the only thing driving the bus.
The adapter: translating to your bus
RAL speaks a generic language of read and write requests. Your design speaks a specific bus, such as APB or AHB. The register adapter is the translator between the two, and you write two functions:
class apb_reg_adapter extends uvm_reg_adapter;
  `uvm_object_utils(apb_reg_adapter)

  function new(string name = "apb_reg_adapter");
    super.new(name);
  endfunction

  // RAL request  ->  bus transaction
  virtual function uvm_sequence_item reg2bus(const ref uvm_reg_bus_op rw);
    apb_item item = apb_item::type_id::create("item");
    item.addr  = rw.addr;
    item.data  = rw.data;
    item.write = (rw.kind == UVM_WRITE);
    return item;
  endfunction

  // bus transaction  ->  RAL response
  virtual function void bus2reg(uvm_sequence_item bus_item, ref uvm_reg_bus_op rw);
    apb_item item;
    $cast(item, bus_item);
    rw.addr   = item.addr;
    rw.data   = item.data;
    rw.kind   = item.write ? UVM_WRITE : UVM_READ;
    rw.status = UVM_IS_OK;
  endfunction
endclass
Wiring RAL into your environment
The register model is created and built in the environment, then its map is connected to the real bus sequencer through the adapter. This connection is what lets a named write() turn into actual bus cycles.
class uart_env extends uvm_env;
  `uvm_component_utils(uart_env)

  uart_reg_block   regmodel;
  apb_agent        apb;
  apb_reg_adapter  adapter;
  uvm_reg_predictor#(apb_item) predictor;

  function void build_phase(uvm_phase phase);
    super.build_phase(phase);
    regmodel = uart_reg_block::type_id::create("regmodel");
    regmodel.build();
    regmodel.lock_model();
    apb       = apb_agent::type_id::create("apb", this);
    adapter   = apb_reg_adapter::type_id::create("adapter");
    predictor = uvm_reg_predictor#(apb_item)::type_id::create("predictor", this);
  endfunction

  function void connect_phase(uvm_phase phase);
    // Point the map at the real sequencer and adapter
    regmodel.reg_map.set_sequencer(apb.sequencer, adapter);
    // Explicit prediction: bus monitor feeds the predictor
    predictor.map     = regmodel.reg_map;
    predictor.adapter = adapter;
    apb.monitor.ap.connect(predictor.bus_in);
  endfunction
endclass
Frontdoor and backdoor access
A frontdoor access is the realistic path: RAL drives the actual bus, cycle by cycle, exactly like software would. A backdoor access skips the bus and reaches the register straight through the design hierarchy, so it happens in zero simulation time. To use backdoor, you give each register or block an HDL path so RAL knows where the signal lives:
// In the register block build(), after add_reg(...)
ctrl.add_hdl_path_slice("u_uart.ctrl_reg_q", 0, 32);
add_hdl_path("tb_top.dut.u_uart");

// In a sequence, force a backdoor read (zero time, no bus):
regmodel.ctrl.read(status, rdata, UVM_BACKDOOR);
Backdoor is handy for setting up state quickly or peeking at a value without disturbing the bus. Frontdoor is what proves the bus path itself works, so a good plan uses both.
Peek and poke
peek() and poke() are backdoor-only cousins of read and write. poke() forces a value straight into the register regardless of its access policy, and peek() reads it back the same way. They are useful when you need to set a read-only or self-clearing field into a known state that a normal write could never reach.
Registers vs memories (uvm_mem)
Not every addressable thing is a register. A large buffer or RAM is modelled with uvm_mem instead of uvm_reg. The difference is that RAL does not keep a full mirror of a memory, because it could be huge; you still read and write it by name, but checking is usually done against your own reference model. Add a memory to the map with add_mem(), just as you add a register with add_reg().
Built-in register test sequences
UVM ships ready-made sequences that exercise a register model with almost no code from you. Running them early finds a surprising number of bugs.
- uvm_reg_hw_reset_seq – reads every register and checks it holds its reset value.
- uvm_reg_bit_bash_seq – writes and reads each writable bit to confirm it sticks and that read-only bits do not change.
- uvm_reg_access_seq – checks that frontdoor and backdoor agree with each other.
- uvm_mem_walk_seq – walks through a memory to confirm every location is addressable.
You point these at your model and start them, and they cover the boring-but-critical basics so your hand-written tests can focus on real behaviour.
Do you write the model by hand?
Usually no. On real projects the register model is generated from a specification format such as IP-XACT or SystemRDL, so the model and the documentation never drift apart. Writing one by hand, as shown above, is still the best way to learn, because it shows exactly what the generator produces and why each argument is there.
Keep learning
If any of the base classes above are new to you, these guides go deeper: browse the UVM guides for testbench structure, the SystemVerilog guides for classes and randomisation, and the Verification Fundamentals for the bigger picture. Getting ready for an interview? See the interview questions.
To place the register model in context, see the typical UVM testbench architecture, how the adapter and predictor sit next to the sequencer and driver, and how the model handle is passed down with uvm_config_db. The built-in hardware reset sequence also pairs well with reset testing using a phase jump.
Frequently asked questions
What does RAL stand for?
RAL stands for Register Abstraction Layer. It lets a UVM test read and write design registers by name instead of by raw address.
What is the register adapter for?
The adapter translates between RAL’s generic read and write requests and your specific bus protocol, such as APB or AHB. It is the piece that lets the same register model work with any bus.
What is the difference between the mirror and the desired value?
The desired value is what your writes have asked for. The mirrored value is what RAL believes hardware currently holds. A read updates the mirror; get() returns the desired value without any bus activity.
What is the difference between implicit and explicit prediction?
Implicit prediction updates the mirror only for accesses made through the model. Explicit prediction adds a predictor connected to the bus monitor, so any bus traffic, including from another master, also keeps the mirror correct.
What is the difference between frontdoor and backdoor access?
Frontdoor drives the real bus and takes simulation time. Backdoor reaches the register directly through the design hierarchy and takes zero time. Both use the same named calls.
Do I have to write every register by hand?
Usually no. Most teams generate the model from IP-XACT or SystemRDL. Writing one by hand is the best way to understand what the generator produces.


Very nice explanation. clear picture it is.
Hi Satya,
Thank you so much for your kind words !!
Great overview of usage of the RAL in verification!!
Thanks Parth 🙂
Very good job on clearly interpreting by keeping it simple!!
Thank you so much Krishna 🙂
I have gone through most of the topics from “The Art of Verification” where your answers and explanation is very clear. Good work.. Suggested to many of my friends.
Hi Manoj,
Thank you so much for your kind words appreciate your efforts to go through the blog posts and sharing with others.
Regards,
Hardik
We’ll explained Hardik. Keep up the great work!
Thanks a lot Vani 🙂
HI Im new to UVM but got around 10 years of exp in Val. Would like to start on this. What is hte best way to start assuming Im really bad in OOP?
Thanks for the suggestions and help
Hi Hafiz,
The best way to start is to understand SV constructs and how it used in Testbench architecture. UVM having better features but if you know SV you can easily compare those things in UVM Testbench architecture.
I hope I can able to help !!
Regards,
Hardik