

How to think like a Verification Engineer
A verification Engineer is not just to write some test scenarios to verify something it’s way beyond that. A verification engineer’s focus after understanding specifications such as test planning, and strategy need to be applied to verify the complex design, and what needs to be implemented using which methodology. Verification engineers always emphasize why and what rather to ask how to be things done. Once you will get answers to your why and what after reading the specifications you have more than a half job done. So it’s all about developing a thought process to break the RTL with your innovative thoughts and the random stimulus you will become generate. That’s how a Verification engineer thinks language or methodology is an instrument to do things, and syntaxes that anyone can learn from any platform but thinking about more scenarios comes to mind to crack any design. so I want to ask you guys whether you want to focus more on syntaxes of language or the thought process of a Verification engineer to generate more scenarios.
Write Test Scenarios for a Coffee Vending Machine
Before directly start writing test scenarios understand and clarify specifications thoroughly. For example
- Is this a normal vending machine or a digital one?
- How many products it can handle? (3/5/7 etc)
- Does it accept both coins and cash? If both then which all coins or cash are accepting (1/2/5/10 etc..)
- Does it accept digital payments/Credit Cards? If yes which all are acceptable?
- Is this having a normal keypad or touchpad?
After clarifying all the doubts you are having after understanding specifications you should start thinking or writing test scenarios to verify a particular design.
Sample Scenarios to verify coffee vending machine
- Verify the input mechanism for coffee ingredients-milk, water, coffee beans/powder, etc
- Verify that the quantity of hot water, milk, coffee powder per serving is correct
- Verify the effect of suddenly switching off the machine or cutting the power. The machine should stop in that situation and in power resumption, the remaining coffee should not get come out of the nozzle.
- Verify that coffee should not leak when not in operation
- Verify the amount of coffee served in single-serving is as per specification
- Verify that the digital display displays correct information
- Check if the machine can be switched on and off using the power buttons
- Check for the indicator lights when the machine is switched on-off
- Verify that the functioning of all the buttons work properly when pressed
- Verify that the complete quantity of coffee should get poured in a single operation, no residual coffee should be present in the nozzle
- Verify the mechanism to clean the system work correctly- foamer
- Verify that the coffee served has the same and correct temperature each time it is served by the machine
- Verify that system should display an error when it runs out of ingredients
- Verify that pressing the coffee button multiple times leads to multiple serving of coffee
- Verify that there is a passage for residual/extra coffee in the machine
- Verify that machine should not make too much sound when in operation
- Performance test – Check the amount of time the machine takes to serve a single serving of coffee
- Performance test – Check the performance of the machine when used continuously until the ingredients run out of the requirements
- Negative Test – Check the functioning of the coffee machine when two/multiple buttons are pressed simultaneously
- Negative Test – Check the functioning of the coffee machine if the ingredient container’s capacity is exceeded
Verify A 2x2 port packet switch
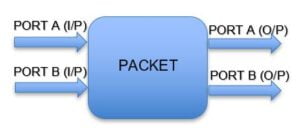
A 2x2 port packet switch specifications:
![]()
Specification: There are two input and output ports A and B as shown above. Each port can receive packets of variable size between 64 and 1518 bytes. Each packet will have a 4 Byte Source Address and 4 Byte destination address along with data and a 4 Byte CRC computed across the packet as shown below. The packet will be switched to one of the output ports based on the Destination Address.
How will you verify the design? How will you generate stimulus and checkers? What will be some of your corner cases for verification?
Answer:
For these kinds of questions where a design specification is given, the first step is to understand the design specification and clarify any questions with the interviewer. The next step is to identify the scenarios to be verified and come up with a verification plan and strategy document. This should list down the features/scenarios to be verified, what methodologies can be used to verify (directed/constrained random, coverage, assertion, etc.), how to check for correctness, etc. Further, details should be provided on how the stimulus can be generated and how checking can be done. Another aspect is to think through all design features and identify corner cases that need to be verified.
Now, let’s try to list down how this simple router design can be verified
Following are some of the scenarios that need to be verified:
- Check for proper switching of packets from Port A to both output ports based on the destination address.
- Check for different packet sizes - minimum size, maximum size, and random sizes in between will be good.
- Check for all possible values of Source and Destination Address.
- Check for different data patterns.
- Check for streaming packets (back to back with no delay, few cycles delay, and large cycles delay), same size packets streamed, or different size packets streamed.
- Check for correct CRC functionality by expecting the correct CRC.
- Check where some bits of SA/DA or data or even the CRC are corrupted.
What more can you think of?
Now, in order to verify the above scenarios, we need to design a constrained random packet generator and we also need a scoreboard/checker that checks for packet correctness and correct switching behavior. If the tests are random, we will also need to write some coverage monitors that make sure all the important scenarios mentioned above are getting covered.
If an interviewer wants to test you more, then he can also continue with questions asking you to actually write a SystemVerilog packet generator code or a checker or driver, etc.
Given a RAM with a single port for read and write - what all conditions need to be verified?
A single port RAM has only a single port for read and write. So, it can only do a read or a write at any given point of time. Other design specifications that need to be considered for verification are the RAM size, and width of address and data bus.
Based on this, following are some of the scenarios that should to be verified:
- Single Read and Write behaves correctly,
- Back to Back reads or writes to the same address and different addresses,
- Writes followed by reads to same address back to back,
- Reads followed by writes to same address back to back,
- Verifying the boundary of RAM sizes - reads and writes,
- Verifying the different patterns of writing into memory location like writing all zeros, all ones, alternating zero/one, walking ones/zeros patterns.
If you are further requested to define a verification environment, you can consider scenarios like above and define whether a directed or constrained random environment will work better and how the stimulus generator and checkers can be designed.
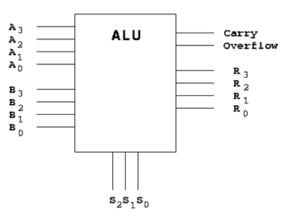
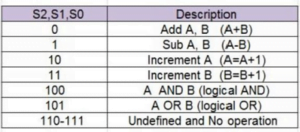
A simple ALU with a block diagram as shown below supports two 4-bit operands, a 4-bit result bus, and carry overflow. The ALU supports up to 8 instructions using a 3-bit opcode or select lines (S2, S1, S0) with decoding as below. Explain all the scenarios that need to be verified to make sure the ALU works as per the specification table below:
Following are the scenarios that need to be verified for this given ALU design:
- Verify that all individual operations work (Add, Sub, Increment, AND, and OR) by driving the two operands A and B, and driving the select lines for each of the operations.
- Verify that if select lines are between 110-111, then no operation happens.
- For each of the above instructions, select minimum and maximum values of A and B and combinations. Given that A and B are 4 bit, the maximum value possible is 4’b1111
- Verify the overflow and underflow cases for ADD and SUB cases. If both A and B are 4’b1111, overflow happens for ADD, while if the value of B is greater than A, underflow happens for SUB.
- Verify wrap-around cases for increment instructions. If A=4’b1111, increment should cause a value of 0.
- Once individual scenarios are verified, create a random sequence of opcodes to verify that the effect of one operation does not affect the following ones. Check for sequences where the same opcodes repeat more than once or different opcodes repeat in different patterns.
- To create a stimulus, you can design a random opcode and operand generator and a simple driver. To check for results, a simple model or ALU can be written and the results can be compared against the same.
How would you track the progress of the verification project? What metrics would you use?
A number of metrics are used to track the progress of verification against a plan. A verification plan captures the scenarios/features to be verified in terms of directed tests or in terms of functional coverage monitor for detailed scenarios and corner cases.
The plan also captures details on verification environment development which includes stimulus generation and checking methodologies.
Progress can be tracked in an early stage of a project by tracking the completeness of environment development (stimulus generator, checker, monitor, etc.), test development, and functional coverage monitor development. Once most of the tests and a constrained random generator are developed, then tests are normally run as regressions on a farm of servers, and then progress is monitored in terms of regression pass rates, bug rate, and functional coverage numbers.
How do you measure the completeness of Verification or when/how can you say that verification is complete?
It’s one of the most common and repeatedly asked questions to every verification engineer. Functional Verification can be called complete when the implemented behavior of a design matches with the design specification without any errors. To achieve this, we need to apply a stimulus to the design to cover every possible input scenario and verify that the design meets specifications without any errors. However, with the ever-increasing complexity of the designs, it is practically not possible to define all the possible input stimulus scenarios. In addition, resource and time limitations also make this ideal definition of completeness impractical. Hence, in most projects, verification completeness is about the confidence achieved through a set of metrics and processes that minimizes the risk of having a design defect.
Following are some of the metrics and processes that are followed to achieve high confidence with respect to verification completeness:
- Reviewing the Verification plan and design specification to make sure all details are understood and captured.
- Ensuring proper completeness in terms of environment development, test development, and functional coverage monitor development against the reviewed plan.
- Review of testbench stimulus generator and constraints, checkers, assertions, and coverage monitor implementation.
- Ensuring all tests are enabled in regression mode with consistently no failures across weeks, all coverage metrics are met and understood.
- Ensuring that bug rates and unresolved bugs are zero or well understood to have no impact on design.
- Waveform Review of important scenarios.
- Ensuring formal verification is done (wherever possible).
- Comparing the rate of incoming bugs and bug trends with that of past successful projects of similar complexity.


Informative..!! Good job Hardik 🙂
Thanks a lot, Dileep 🙂 Appreciate it