
UVM Phasing
Today I’m going to share something which is so common to almost every concept of UVM. In other way, we can say that this concept is the backbone of the UVM Verification Methodology. This is related to the process which deals from the starting of the simulation till end of the simulation.
So in this post, we’re going to know about UVM Phasing. UVM Phasing is a continuously evolved concept with time. This may sound so basic for few experienced users but I believe it will be certainly helpful to many of those friends who are relatively new to UVM.
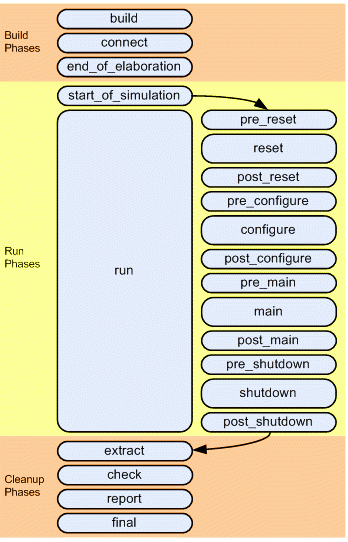
Unlike a module based testbench (in which all modules exist statically in a hierarchy), class based testbench need to manage creation of different objects and execution of various tasks and functions in those objects. Phasing is an important concept in class based testbenches to have a consistent testbench execution flow. A test execution can be conceptually divided into the following tasks:
- Build Phases: the testbench is configured and constructed. It has following sub-phases which are all implemented as virtual methods in uvm_component base class.
- build_phase(): The top-level is a test and that test builds the testbench. In order to do this, the build_phase is necessary. The build_phase is the first phase in the flow and is the only phase that is called in a top-down manner starting with the test. Its purpose is to create all of the UVM components. Before we look at the example code, there are a few key points you need to remember for this phase.
- Every build_phase function should call super.build_phase first so that the build_phase function in the parent class is executed.
- Configuration for a component should be done before a component is created.
- All UVM components should be created in this phase.
Let’s look at an example from an AXI agent and discuss the lines of code
function void build_phase(uvm_phase phase);
  super.build_phase(phase);
  if(is_active == UVM_ACTIVE)
    begin
      sequencer = axi_sequencer::type_id::create("sequencer", this);
      driver    = axi_driver::type_id::create("driver", this);
    end

      monitor = axi_monitor::type_id::create("monitor", this);

  `uvm_info(get_full_name(), "BUILD PHASE COMPLETE", UVM_LOW);

endfunction : build_phase
Every phase function or task takes an argument of “phase” that is of type “uvm_phase”. The phase argument contains information regarding the behavior and state of the phase. When you call super.build_phase, you pass phase as an argument there as well. In this build_phase function, we create a driver and sequencer only if this agent is active. The monitor is always created since it is ever-present in active and passive agents. For now, don’t worry about “is_active” and “UVM_ACTIVE”. We’ll explore both of those later.
- connect_phase(): The connect_phase happens directly after the build_phase and does exactly what you would expect. It connects the environment topology. In other words, you have created all of the UVM components in the build_phase and some of those components need to communicate with each other. Those connections are done in this phase. For example, if you need to connect an analysis port from a monitor to the analysis export in a scoreboard, you would do that in the connect_phase.
Here’s a code example:
function void connect_phase(uvm_phase phase);
  // Connect the analysis ports in the monitor to scoreboard and coverage class

axi_env.axi_agent.axi_monitor.item_collected_port.connect(axi_scoreboard.axi_packets_collected.analysis_export);
        axi_env.axi_agent.axi_monitor.item_collected_port.connect(axi_coverage.analysis_export);

  `uvm_info(get_full_name(), "CONNECT PHASE COMPLETE", UVM_LOW);

endfunction : connect_phase
In the above-mentioned code, the monitor’s connect_phase function calls the analysis port’s connect function. The argument to the function is the scoreboard’s analysis export. The second connection is from the same analysis port in the AXI monitor to an analysis export in a coverage object. Please don’t worry about the terms analysis port and analysis export. The ports and exports are simply a communication mechanism for passing transactions. In the example above, every collected transaction in the monitor is sent to the scoreboard and a coverage object.
end_of_elaboration(): This phase is where you should place any post elaboration activity. For example, this is an excellent place to print topology information, which I highly recommend. The resulting printout of the testbench hierarchy in the log file can be a valuable aid in debugging. It also adds documentation in the log file of what was actually created. The UVM User Guide also gives examples of setting a message verbosity of a component in this phase or setting an address map.
function void end_of_elaboration_phase(uvm_phase phase);
  // This prints the hierarchy information at the end_of_elaboration phase

  `uvm_info(get_full_name(), $sformatf("Print the Test Topology: \n%s", this.sprint(printer)), UVM_LOW);

endfunction : end_of_elaboration_phase
The printer here is of type uvm_table_printer. It is instantiated in a base test that other tests may inherit from. Here’s an example:
class base_test extends uvm_test;
  uvm_table_printer printer;
  ...
  ...
  virtual function void build_phase(uvm_phase phase);
    ...
    printer = new();
    printer.knobs.depth = 5;
    ...
    `uvm_info(get_full_name(), "BUILD PHASE COMPLETE", UVM_LOW);
  endfunction : build_phase
endclass : base_test
The printer contains knobs that allow you to control what information is printed. In this example, I want the printed topology to only have a recursive depth of 5, i.e., five levels deep into the constructed hierarchy would be printed. If the depth were set to –1, then everything would have been printed. If the concept of control knobs is confusing, picture the volume knob on a radio. By turning this knob, you control how loud the music is played. Now think of an audio soundboard which has dozens of knobs. By tweaking those knobs, you create a configuration of how the audio should sound. Control knobs in the testbench also create a configuration, whether it is test parameters or how deep you want the topology printed.
- Run time Phases: These phases can consume time and this is where most of the test execution happens.
start_of_simulation(): This phase can be used to initialize any components before the simulation starts. You could also print any configuration information for the test you are running for debug reference.
virtual function void start_of_simulation_phase(uvm_phase phase);
  `uvm_info(get_full_name(), {"***** START OF SIMULATION FOR ", get_full_name()}, UVM_LOW);
endfunction : start_of_simulation_phase
run_phase(): The run_phase is the only phase that is implemented as a task and is time consuming. Any event or thread that needs to occur during the run time execution of your simulation should be in the run_phase. Let’s review a simple run_phase task from an AXI driver.
virtual task run_phase(uvm_phase phase);
  fork
    reset();
    drive();
    address_phase();
    data_phase();
  join
endtask: run_phase
In this run_phase task, four other tasks are forked so that they run concurrently. There is a task for reset that drives the signals to zero while reset is active. The drive task receives the AXI packets which will be sent to the address_phase and data_phase tasks.
Also, within this phase there are a set of twelve run time phases. These phases allow you to further partition when certain events occur such as during reset or shutdown. If you use the run time phases, they should only be used for stimulus partitioning.
The run_phase() is further divided into 12 sub-phases as below:
- Pre_reset: pre_reset phase starts at the same time as the run phase. Its purpose is to take care of any activity that should occur before the reset. E.g. waiting for a power signal to go active.
- Reset: As the name indicates, reset phase is specially for DUT or Interface specific reset behavior. This phase would be used to generate reset to put the DUT/Interface into a default state.
- Post_reset: This phase is intended for any activity required just after the reset phase.
- Pre_configure: This phase is intended for anything that is required to prepare for the DUT configuration process after the DUT is out of reset.
- Configure: This phase is used to put the DUT into a known state before the stimulus could be applied to the DUT. For example – programming the control registers of the device for a particular test scenario.
- Post_configure: This phase is intended to wait for the effect of the configuration to propagate through the DUT.
- Pre_main: This phase is used to ensure that all the components needed to generate the stimulus are ready to do so.
- Main: This phase is where the stimulus specified by the Test case is generated and applied to the DUT. It completes in two conditions: One is the stimulus gets exhausted and another is when timeout occurs. Sequences are started in this phase to generate the stimulus.
- Post_main: This phase is used for any final act after the main phase.
- Pre_shutdown: This phase is acts like a buffer to apply any stimulus before the shutdown phase starts.
- Shutdown: This phase is to ensure that the effects of stimulus generated during the main phase has propagated through the DUT and that the resultant data has drained away. It might also be used to execute the time consuming sequences that read status registers.
- Post_shutdown: This phase is intended for any final activity before exiting the run phase. After it UVM Testbench starts the cleanup phase.
- Clean up phases: This phase execute after the test ends and is used to collect, and report results and statistics from the test. This consists of the following sub phases:
- extract(): This phase is used to retrieve and process information from Scoreboards and Functional Coverage Monitors. This may include the calculation of statistical information used by the report phase. This phase is usually used by Analysis side components.
- check(): This phase is also used by the Analysis Components. This phase is used to check if the DUT behaved correctly and to find any errors that may have occurred during the stimulus execution.
- report(): This phase is used to display the results of the simulation to the standard output or to write the results to file. This phase is usually used by Analysis Components.
final(): This phase is used to complete any other outstanding actions that the Testbench has not already completed.
Before getting into the details of each sub-phase, lets see how the UVM Phasing is triggered from the very beginning of a simulation cycle.