
How to build UVM Environment Part – 2
SEQUENCER
The job of the sequencer is to control the flow of sequences to the driver. The fact that you can write six lines of code yet have a powerful implementation is the beauty of UVM. Having the sequencer mechanism prepared for you in the library allows you to build the testbench faster and more effectively.
Let’s briefly examine the connection between the sequencer and the driver. The sequencer’s seq_item_export is connected to the driver’s seq_item_port, and it defines the functions used to retrieve packets.
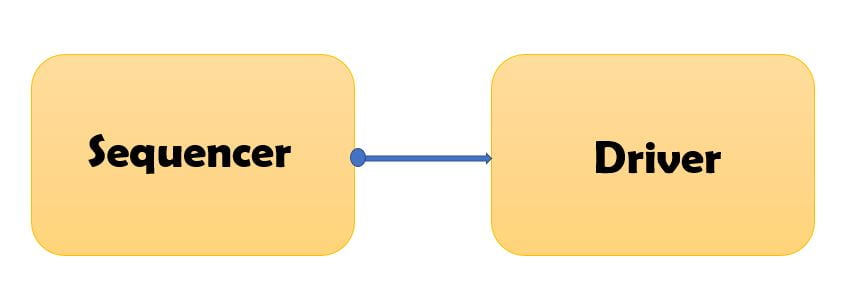
This connection is made in the agent, which we will examine later. For completeness, here is the sequencer for the example pipe DUT.
class pipe_sequencer extends uvm_sequencer #(data_packet);
  `uvm_component_utils(pipe_sequencer)

  function new(string name, uvm_component parent);
    super.new(name, parent);
  endfunction: new

endclass: pipe_sequencer
In the next section, we will explore a few ways to generate sequences.
SEQUENCES
Now is the right time to review graphically the components we have built thus far.
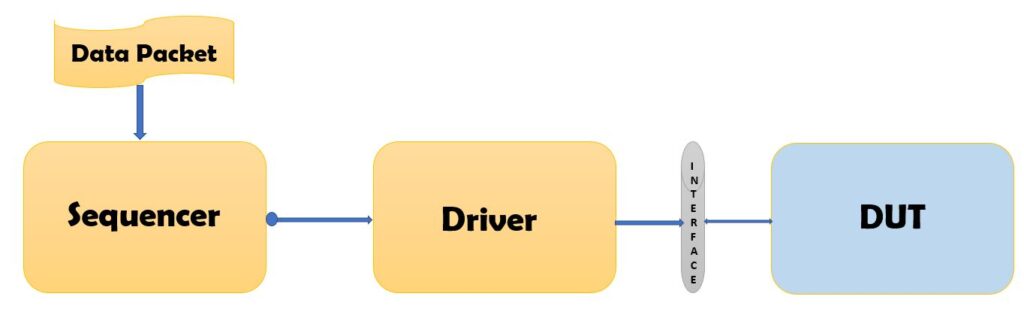
We have our data packet, the interface, a driver, and a sequencer. Now we need to learn how to create sequences using the data packet.
A sequence specifies one or more sequence items to be sent to the driver; in other words, one or more packets to be driven. Typically, sequence classes are derived from uvm_sequence and parameterized with your uvm_sequence_item type.
Your sequence class will have a task, body( ), that starts the sequence. Let’s look at the first example with the `uvm_do macro.
class random_sequence extends uvm_sequence #(data_packet);
  `uvm_object_utils(random_sequence)

  function new(string name, uvm_component parent);
    super.new(name, parent);
  endfunction: new

  virtual task body();
    `uvm_do(req);
  endtask: body

endclass: random_sequence
As mentioned with the driver, req is a member of uvm_sequence that is now parameterized as data_packet. The macro, `uvm_do, creates the transaction if it is not already created, randomizes it, and sends it to the sequencer. Of course, this only sends one transaction. You can easily use a for loop to send several random packets.
class multiple_random_sequence extends uvm_sequence #(data_packet);
  rand int loop;

  constraint limit {loop inside {[5 : 10]};}
  `uvm_object_utils(multiple_random_sequence)

  function new(string name, uvm_component parent);
    super.new(name, parent);
  endfunction: new

  virtual task body();
    for(int i = 0; i < loop; i++) begin
      `uvm_do(req);
    end
  endtask: body

endclass: multiple_random_sequence
A companion macro that you will use often is uvm_do_with. As with uvm_do, it creates your transaction, however, it now randomizes it with the inline constraints that you provide. Finally, it sends it to the sequencer.
For example, let’s constrain data_in1 to be 0.
class data1_sequence extends uvm_sequence #(data_packet);

  `uvm_object_utils(data1_sequence)

  function new(string name, uvm_component parent);
    super.new(name, parent);
  endfunction: new

  virtual task body();
    `uvm_do_with(req, {req.data_in1 == 16'h0;});
  endtask: body

endclass: data1_sequence
Another way to start a sequence item is to use start_item/finish_item. The function, start_item, initiates the start of the sequence, but the item has to be created first. You then randomize and constrain that item before calling finish_item. In the following example, I have created the item before the start_item function.
class data2_sequence extends uvm_sequence #(data_packet);

  `uvm_object_utils(data2_sequence)

  function new(string name, uvm_component parent);
    super.new(name, parent);
  endfunction: new

  virtual task body();
    req = data_packet::type_id::create("req");
    start_item(req);
    assert(req.randomize() with {data_in2 == 16'hFFFF;});
    finish_item(req);
  endtask: body

endclass: data2_sequence
One question you may have is how to connect the sequence to the sequencer. One way this is done is by calling the sequence’s start function with the sequencer as an argument. We will explore how to do that while developing Tests.
For now, let’s continue to build the testbench by creating the monitor.
MONITOR
The monitor is a passive component in the testbench that serves two functions: it verifies the protocol and collects transactions for checking and coverage. While developing the monitor, if you find yourself duplicating the code in the driver, stop. The monitor should not be a duplication of the driver but a complementary element that understands the protocol so it can sample the transactions at the right time.
When the transaction is sampled or collected, it is then written to an analysis port. Although not a completely accurate analogy, since it implies storage, but I like to think of the analysis port as a dropbox. You drop the collected transaction in the box where it can then be picked up by whatever component needs it, such as a scoreboard or coverage object.
Let’s review the code for monitor of the pipe example.
class pipe_monitor extends uvm_monitor;
  virtual interface pipe_if vif;
  string monitor_intf;
  int num_pkts;

  uvm_analysis_port #(data_packet) item_collected_port;
  data_packet data_collected;
  data_packet data_clone;

  `uvm_component_utils(pipe_monitor)

  function new(string name, uvm_component parent);
    super.new(name, parent);
  endfunction: new

  function void build_phase(uvm_phase phase);
    super.build_phase(phase);

    if(!uvm_config_db#(string)::get(this, "", "monitor_intf", monitor_intf))
      `uvm_fatal("NOSTRING", {"Need Interface Name for: ", get_full_name(), ".monitor_intf"})

    `uvm_info(get_type_name(), $sformatf("INTERFACE USED = %0s", monitor_intf), UVM_LOW)

      if(!uvm_config_db#(virtual pipe_if)::get(this, "", "monitor_intf", vif))
        `uvm_fatal("NOVIF", {"Virtual Interface must be set for: ", get_full_name(), ".vif"})

    item_collected_port = new("item_collected_port", this);
    data_collected      = data_packet::type_id::create("data_collected");
    data_clone          = data_packet::type_id::create("data_clone");

    `uvm_info(get_full_name(), "Build Stage Complete", UVM_LOW)
  endfunction: build_phase

  virtual task run_phase(uvm_phase phase);
    collect_data();
  endtask: run_phase

  virtual task collect_data();
    forever begin
      wait(vif.enable)
      data_collected.cf = vif.cf;
      data_collected.data_in1 = vif.data_in1;
      data_collected.data_in2 = vif.data_in2;
      repeat(3) @(posedge vif.clk);
      data_collected.data_out1 = vif.data_out1;
      data_collected.data_out2 = vif.data_out2;
      $cast(data_clone, data_collected.clone());
      item_collected_port.write(data_clone);
      num_pkts++;
    end
  endtask: collect_data

  virtual function void report_phase(uvm_phase phase);
    `uvm_info(get_type_name(), $sformatf("REPORT: PACKETS COLLECTED = %0d", num_pkts), UVM_LOW)
  endfunction: report_phase

endclass: pipe_monitor
I have declared a virtual interface, vif, a string, monitor_intf, and an int, num_pkts. The monitor collects the data from the signals on this virtual interface. The int, num_pkts, is simply used to keep track of how many transactions are collected. The string, monitor_intf, is used in conjunction with the configuration database. I will expand on this statement further when we examine the build_phase.
Next, I have declared item_collected_port, which is an analysis port. The analysis port is parameterized to the data_packet. Once you have collected the data for one transaction, you call the analysis port’s write function to deposit that data. The data_packet, data_collected, is the packet used to store the data from the interface. Once complete, data_collected is cloned to data_clone and that cloned packet is written to the analysis port.
Cloning the packet before you write it to the analysis port is crucial. When you pass the transaction object as an argument to the write function, UVM does this using a pass-by-reference, and therefore it does not create a new object. If you were to send the original data packet collected, it would be altered as you collect the next transaction. As mentioned in the example, the first time I did this the packet I was collecting contained four queues. I wrote the collected data to the analysis port without cloning.
Since I did not want the queues to continue to grow with each transaction, I deleted the data in the queues to start the next transaction with a clean slate. Unwittingly, I had also deleted the data in the queues that I was trying to use in my scoreboard. With this approach, I am making the assumption that the cloned data packet will not be changed by a subscribing object. If it is possible that the object could be changed in the scoreboard, coverage model, or any other subscriber, you want to clone the object in the subscriber.
Two things of note are happening in the build_phase. First, I am using the configuration database to retrieve the virtual interface. The monitor is being reused in the input agent and the output agent. The output agent is the same as the input agent, except that it is set as “passive” and only creates the monitor. We will review agents in the next chapter. There are two instances of the interface, so two configuration database entries are needed to ensure that the monitor retrieves the correct one. These interfaces are declared and instantiated at the top level.
To break down what the set function is doing, “uvm_root::get( )”, is getting the top level and setting that as the context. Using the wildcard is making this entry available globally. Finally, you are giving the interface instance, ivif, the name or label “in_intf” in the database. The output interface is labeled “out_intf”.
Using the wildcard, in this case, is acceptable given the small nature of the testbench. However, in a larger design, you want to limit how often you have a database entry globally available. Making it globally available could have a performance impact as well as affect debug. For example, if you were trying to debug a configuration entry and you have 200 that are all globally available, printing them out and trying to find the one line that you need would be difficult. It is better to limit the scope of availability if possible.
The first call to get retrieves the value stored in “monitor_intf” in the database for either the input or the output. It then assigns that string value to the string monitor_intf. For debug purposes, it prints out the value of monitor_intf, and then the final get call assigns the name of the interface which is stored in the string monitor_intf to the virtual interface instance, vif.
The final part of the build_phase is creating the objects the monitor will be using. The uvm_analysis_port is not registered with the factory, so to create it you call the constructor as usual. I have used the factory to create
data_collected and data_clone. In this case, using the factory is not necessary since these objects will not need to be overridden, but it is good practice to use the factory whenever possible.
The run_phase simply calls the task collect_data( ) where the transaction collection is done.
In this forever loop, it first waits for the enable signal of the interface. Once it is high, it collects the input values on the interface and assigns them to their corresponding values in data_collected. After three clock cycles, the output data is valid and so that is collected. Again, once the data is collected, it’s cloned and assigned to data_clone with $cast. The packet, data_clone, is finally written to the analysis_port with a call to the analysis port’s write function.
The final portion of the monitor is the report_phase.
Each time a packet is written to the analysis port, num_pkts is incremented. The number of packets collected is then printed in the report_phase after the run_phase has completed. Remember, this monitor is for both the input and the output, so seeing the number of packets collected and comparing the two in the scoreboard is a good method to check that a packet was not lost.
The three components of an agent, driver, sequencer, and monitor, have now been built. In the blog post, we will examine how to construct the agent and an environment till then see ya stay safe 🙂

Hi Hardik,
if(!uvm_config_db#(string)::get(this, “”, “monitor_intf”, monitor_intf))
here u are getting monitor interface using alias “monitor_intf” right. But I couldn’t see anywhere u set anything to the alias name “monitor_intf”.
I have same doubt in the following line also.
if(!uvm_config_db#(virtual pipe_if)::get(this, “”, “monitor_intf”, vif)).
In top u are using aliases “in_intf” and “out_intf”. What I learned is the same alias need to be used while getting also. Otherwise how they will connect?
Thanks,
Vivek