
UVM Testbench Architecture (2026): Diagram, Components, Example
In short: UVM testbench architecture is the standard way to split a chip testbench into small classes with one job each. A test picks the scenario, an env holds it all, each agent owns one interface (sequencer, driver, monitor), a scoreboard checks results and coverage measures what was tested. Built this way, block testbenches get reused at chip level.
- What it is: a layered set of UVM classes (IEEE 1800.2) that turns transactions into pin activity, watches the pins, and checks results automatically.
- What changed in 2026: Accellera lists the UVM 2020-3.2 library (August 2026), and Cadence, Synopsys and Siemens all launched agentic AI tools that draft testbenches, plans and debug notes.
- The catch: AI and templates can write the boilerplate, but they cannot tell you what the design is supposed to do. The checker is still your job.
- The rule: stimulus lives in sequences, pins live in drivers and monitors, all checking lives in the scoreboard, and every component is created through the factory.
- Why it pays: the same agent runs active at block level and passive at SoC level, so your monitor, scoreboard and coverage survive three levels of integration.
Why UVM testbench architecture still matters in 2026
A UVM testbench is the code that tests a chip design, the DUT (design under test). It is built from classes in the UVM library, which is standardized as IEEE 1800.2-2020, still the active edition in October 2026.
UVM splits the testbench into small parts with fixed jobs and fixed ways of talking to each other. That is what makes a block-level testbench reusable at subsystem and chip level, and why most ASIC teams use it.
Why does the structure matter so much? Because verification is where projects win or lose. The 2026 Wilson Research Group study (604 qualified participants) says verification consumes roughly half of project time.
The same 2026 study reports that only 5% of IC/ASIC projects reached first-silicon success, down from 14.4% in 2024 (Siemens EDA, September 2026). In the 2024 data, 75% of projects were behind schedule (Semiconductor Engineering, March 2025).
“The industry has hit the lowest point ever in achieving first-silicon success.” Harry Foster, Siemens EDA, speaking about the 2024 data (Semiconductor Engineering).
A clean architecture does not fix a bad spec. But it means every hour you spend goes into finding bugs, not into rewiring a testbench that was never built to be reused.
This guide merges and updates the older Art of Verification series on UVM testbench architecture and building a UVM environment, plus the old “advantages of UVM over SystemVerilog” post, into one page. Everything you need is here: the diagram, every component, a full working example, SVA, coverage, debug, AI help, and three project examples.
What the industry data says (2024 to 2026)
Here is what was actually reported, and how a working verification engineer should read each number.
| Source | What was reported | How to read it |
|---|---|---|
| Siemens EDA, 2026 Functional Verification Study | 5% of IC/ASIC projects hit first-silicon success in 2026, down from 14.4% in 2024 | Fewer chips work the first time. Reusable, trusted checkers are worth more than ever. |
| 2026 Executive Findings (Verification Academy) | 604 qualified participants; verification takes roughly half of project time; most projects behind schedule | Testbench build and upkeep is a big slice of that half. Reuse is where time comes back. |
| Semiconductor Engineering (March 2025, 2024 data) | First-silicon success 14%; 75% of projects behind schedule | The 2024 baseline that the 2026 number fell from. |
| IEEE 1800.2-2020 | Active UVM standard, published September 2020; no newer revision project listed | The class names and phases in this guide are stable. Learn them once. |
| Accellera UVM downloads | UVM 2020-3.2 listed with an August 2026 date; 2020-3.1 dated August 2024 | Use a 2020-series library for new projects; old 1.1d code mostly ports with small fixes. |
| Accellera UVM-MS 1.0 (February 2025) | Standard mixed-signal extensions: an MS bridge module and an MS proxy class | The same agent pattern now reaches analog pins in a standard way. |
| Antmicro (October 2025) | Open-source Verilator elaborates upstream UVM 2017-1.0 with no patches; UVM 2020 support planned | You can learn UVM on a free simulator, with limits (covergroups and DPI still partial). |
| Cadence ChipStack AI Super Agent (February 2026) | Vendor claims up to 10x productivity on testbench and test plan work; Tenstorrent reported up to 4x less verification time on three blocks | Vendor and early customer numbers, not independent results. Treat as a direction, not a promise. |
| Synopsys AgentEngineer (March 2026) | Agentic workflow that generates unit-level testbenches; 2x productivity, up to 5x in select cases (vendor claim) | AI is landing exactly on the boilerplate this article teaches. You still need to judge its output. |
| Siemens Questa One Agentic Toolkit (February 2026) | Early access agents for verification planning, debug, lint, CDC and RTL code | Planning and debug agents need a clean testbench structure to make sense of logs and coverage. |
What is a UVM testbench? A plain explanation and an analogy
Think of a parcel delivery company. One person decides what to send, a counter queues the parcels, vans drive them to houses, a doorbell camera records what actually arrived, a claims desk checks it, and auditors keep a record of which kinds of deliveries ever happened.
A UVM testbench is the same company. Each role is a class, and each class only talks to its neighbours through fixed doors.
| Delivery company | UVM component | Its one job |
|---|---|---|
| A parcel | Sequence item | One unit of data (one bus read or write) |
| The customer deciding what to send | Sequence | Decides which parcels to send, in what order |
| The counter queue | Sequencer | Hands parcels to the van one at a time, picks between customers |
| The delivery van | Driver | Turns a parcel into pin activity on the DUT |
| The doorbell camera | Monitor | Watches the pins and rebuilds what was really delivered |
| One local branch | Agent | Groups counter, van and camera for one interface |
| The claims desk | Scoreboard | Compares what arrived with what should have arrived |
| The audit team | Coverage collector | Tracks which kinds of deliveries were ever made |
| The whole company | Environment (env) | Holds and connects all branches, the claims desk and the auditors |
| Head office | Test | Decides today’s campaign: which sequences, which settings |
| The road between office and house | Virtual interface | Connects the class world to the real DUT signals |
Keep this table in mind. Every code block below maps to one row.
Why UVM and not plain SystemVerilog?
SystemVerilog is the language. UVM is a class library and a set of rules written in SystemVerilog. You could build all of this yourself, and in the early 2000s many teams did, each in a different way.
UVM gives five things you would otherwise rebuild on every project:
- Modularity and reuse: agents and envs drop into the next level up without edits.
- Tests separate from the testbench: a new test is a small class, not a new testbench.
- A sequence system: stimulus is written once and layered, reused and randomized.
- A configuration database:
uvm_config_dbpasses settings and interface handles without hard-coded paths. - The factory: swap a component or item type from a test, without touching the env.
For a tiny throwaway check of one module, plain SystemVerilog is quicker because there is nothing to learn. The bigger and longer-lived the project, the more UVM pays back. UVM removes repeated plumbing. It does not remove the thinking about what to verify.
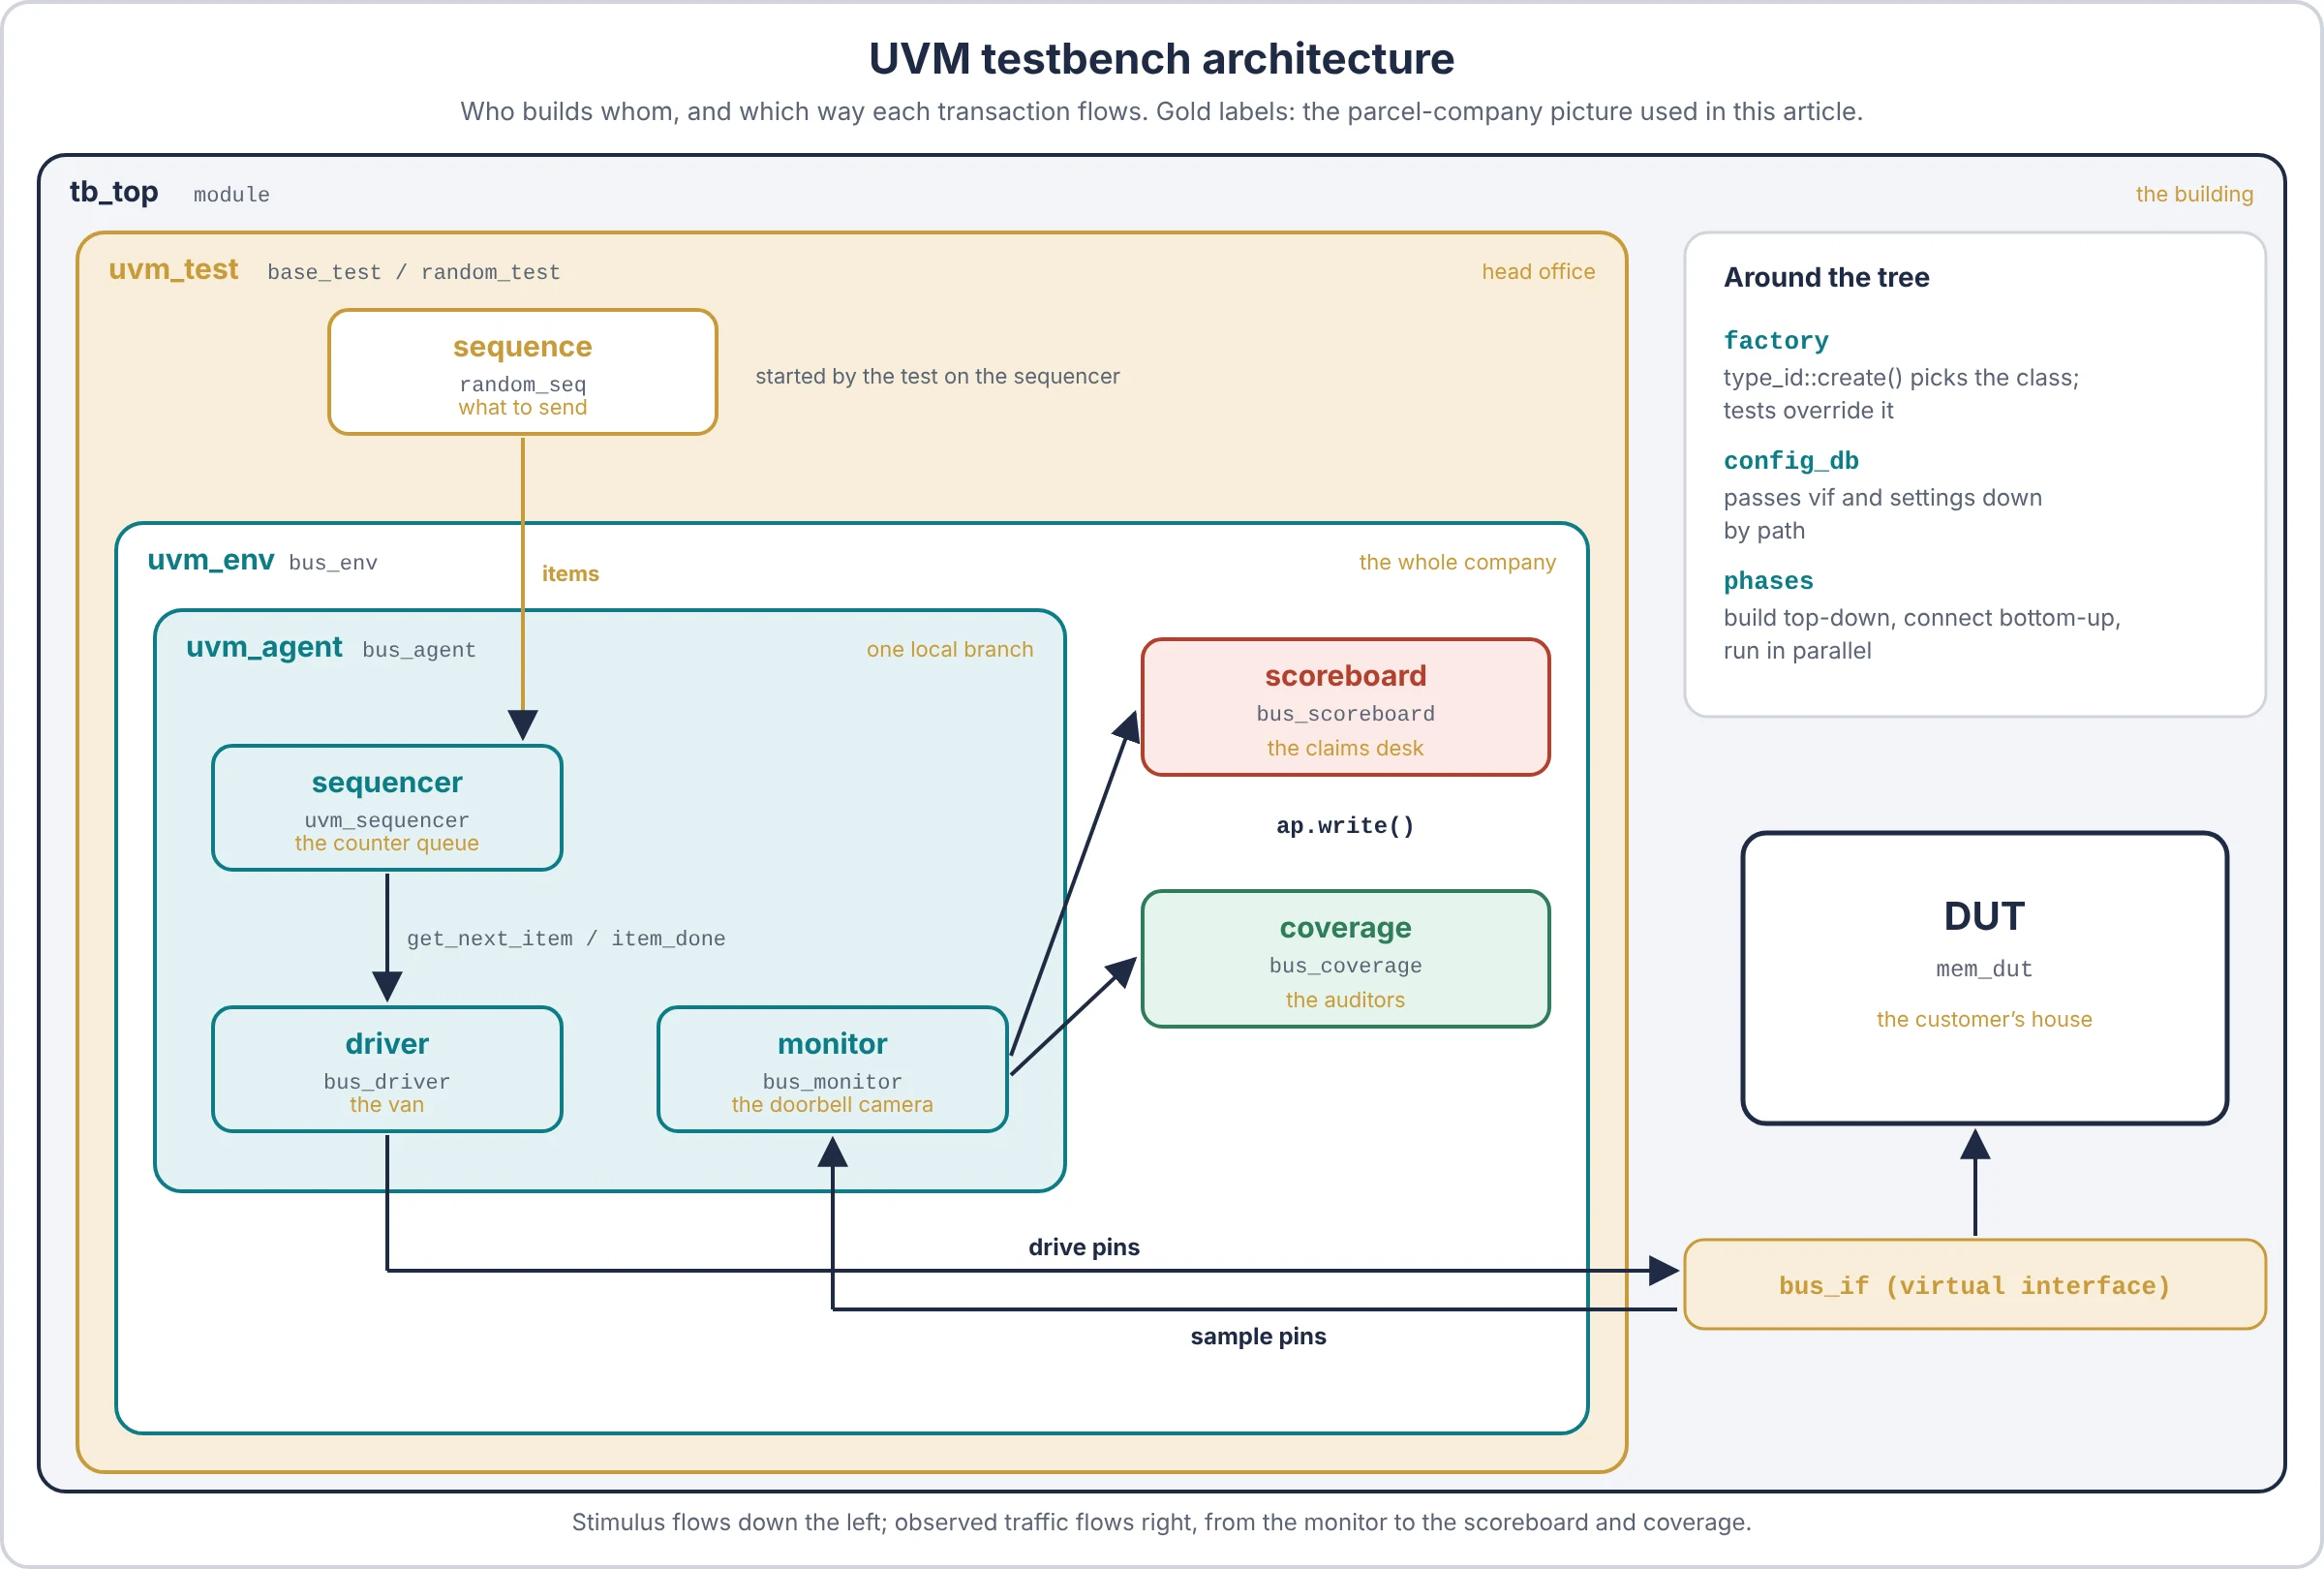
UVM testbench architecture diagram
Here is the whole testbench on one page. Stimulus flows down the left side. Observed results flow up the right side.
The same layers as a picture, from the original version of this page:
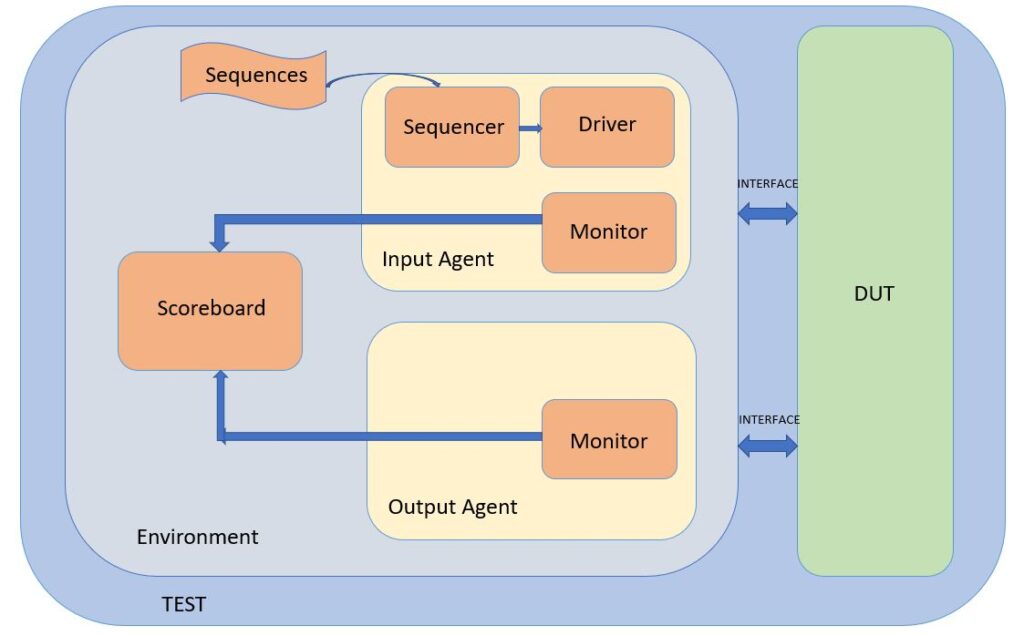
How to read the diagram:
- The outer box is
tb_top, a normal SystemVerilog module. It creates the clock, the interface and the DUT, then callsrun_test(). - Everything inside
uvm_test_topis made of classes. They are created at run time, which is why they need a virtual interface to reach real signals. - Down arrows are stimulus: sequence, sequencer, driver, pins. Up arrows are observation: pins, monitor, analysis port, scoreboard and coverage.
- The monitor never drives. The driver never checks. That split is what lets the agent go passive later.
What are the components of a UVM testbench?
| Component | UVM base class | Active or passive | One-line job |
|---|---|---|---|
| Sequence item | uvm_sequence_item | Data | One transaction, with rand fields and constraints |
| Sequence | uvm_sequence | Stimulus | Creates and sends a series of items |
| Sequencer | uvm_sequencer | Active | Arbitrates between sequences, feeds the driver |
| Driver | uvm_driver | Active | Converts items into pin activity |
| Monitor | uvm_monitor | Passive | Converts pin activity back into items |
| Agent | uvm_agent | Either | Groups sequencer, driver and monitor for one interface |
| Scoreboard | uvm_scoreboard | Passive | Checks observed results against expected |
| Coverage collector | uvm_subscriber | Passive | Samples covergroups from monitor items |
| Environment | uvm_env | Structure | Builds and connects agents, scoreboard, coverage |
| Test | uvm_test | Top | Configures the env and starts sequences |
| Config object | uvm_object | Data | Holds knobs (active or passive, checks on or off) for one env or agent |
Two families, one rule. The sequence item, sequence and config objects are uvm_objects: created and thrown away during the run, with no place in the hierarchy. Everything else is a uvm_component: built once in build_phase, with a fixed parent and a fixed path like uvm_test_top.env.agt.drv.
If you mix these up, phases and the factory stop working as expected. A sequence has no build_phase. A driver cannot be created in the middle of run_phase.
How does a UVM testbench work, step by step?
Three mechanisms run the whole architecture: phases decide when things happen, the factory decides which class gets built, and the config database decides who gets which settings. Learn these three and the rest is detail.
Which UVM phase builds which part of the architecture?
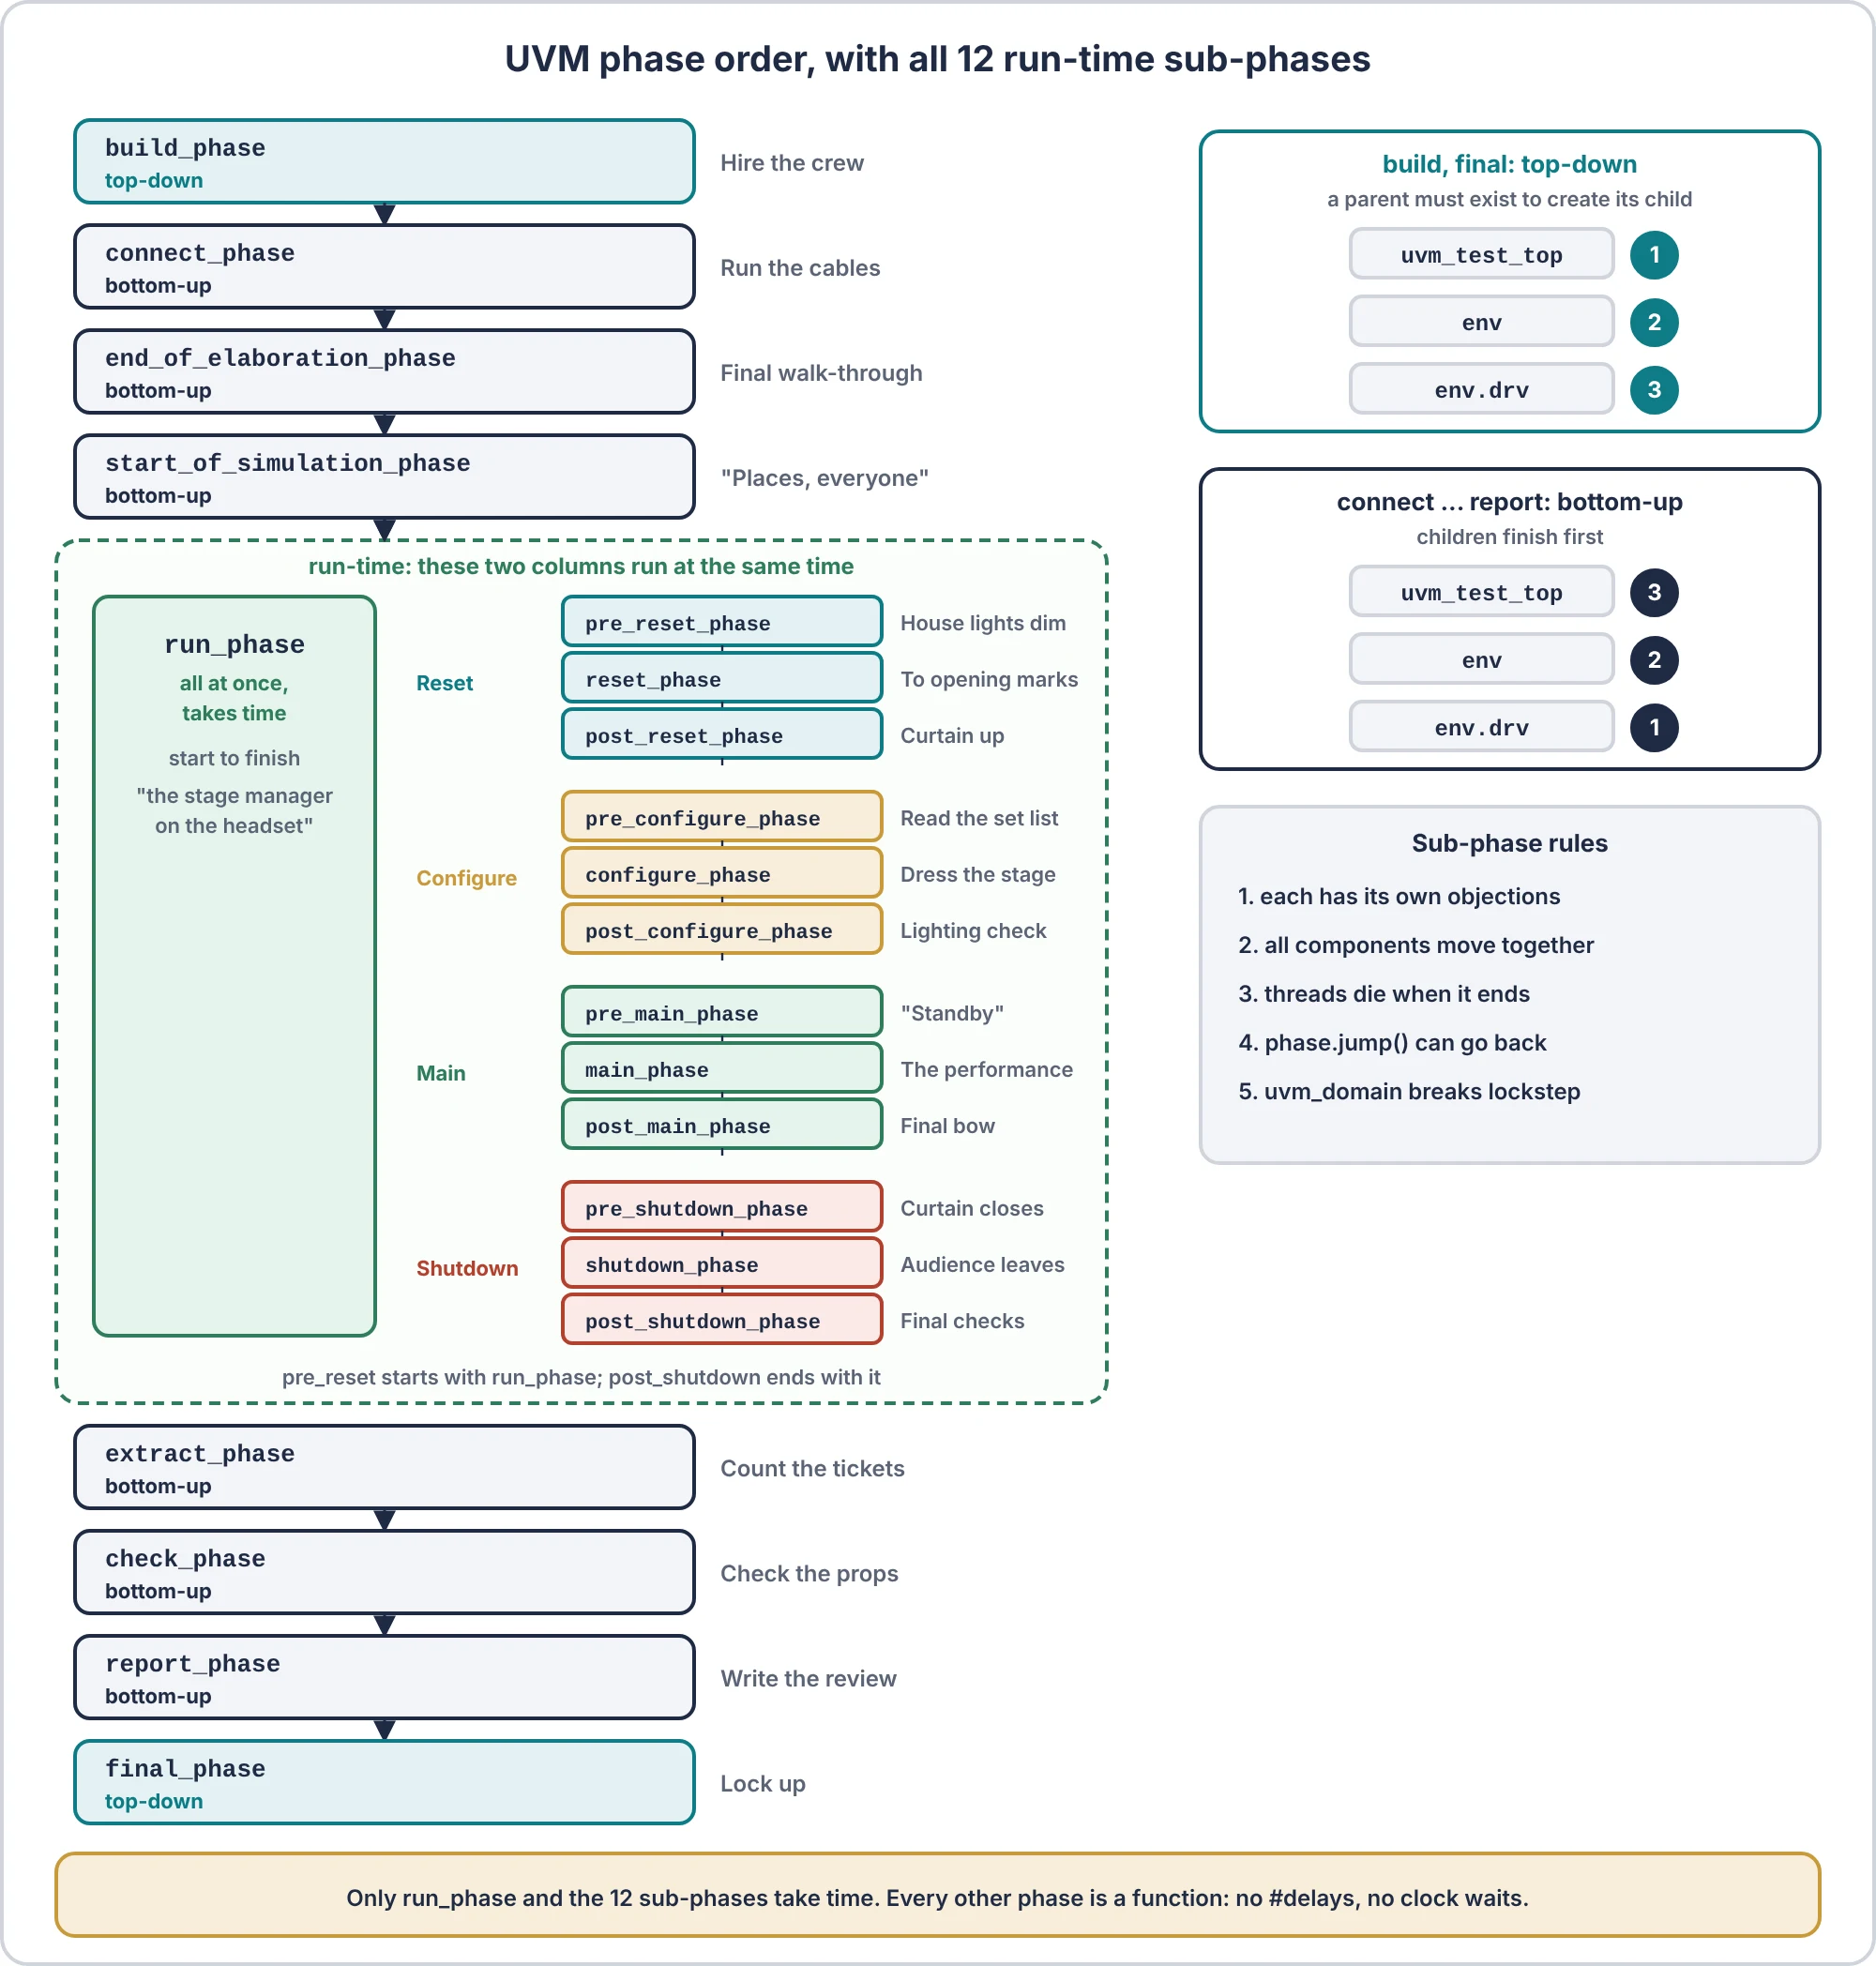
| Phase | Order | What happens in this testbench |
|---|---|---|
build_phase | Top-down | Test builds env; env builds agent, scoreboard, coverage; agent builds sequencer, driver, monitor; driver and monitor get the virtual interface |
connect_phase | Bottom-up | Driver connects to sequencer; monitor’s analysis port connects to scoreboard and coverage |
end_of_elaboration_phase | Bottom-up | Print the topology, check configuration |
run_phase | Parallel tasks | Driver and monitor loops run; test starts the sequence under an objection |
check_phase | Bottom-up | Scoreboard checks nothing is left pending and that it checked at least one item |
report_phase | Bottom-up | Scoreboard prints its match and mismatch counts |
Build is top-down because a parent must exist, and must set config, before its children are built. Connect is bottom-up because ports must exist before you hook them up. More detail: UVM phasing and how UVM phasing is triggered.
How does one transaction travel through the testbench?
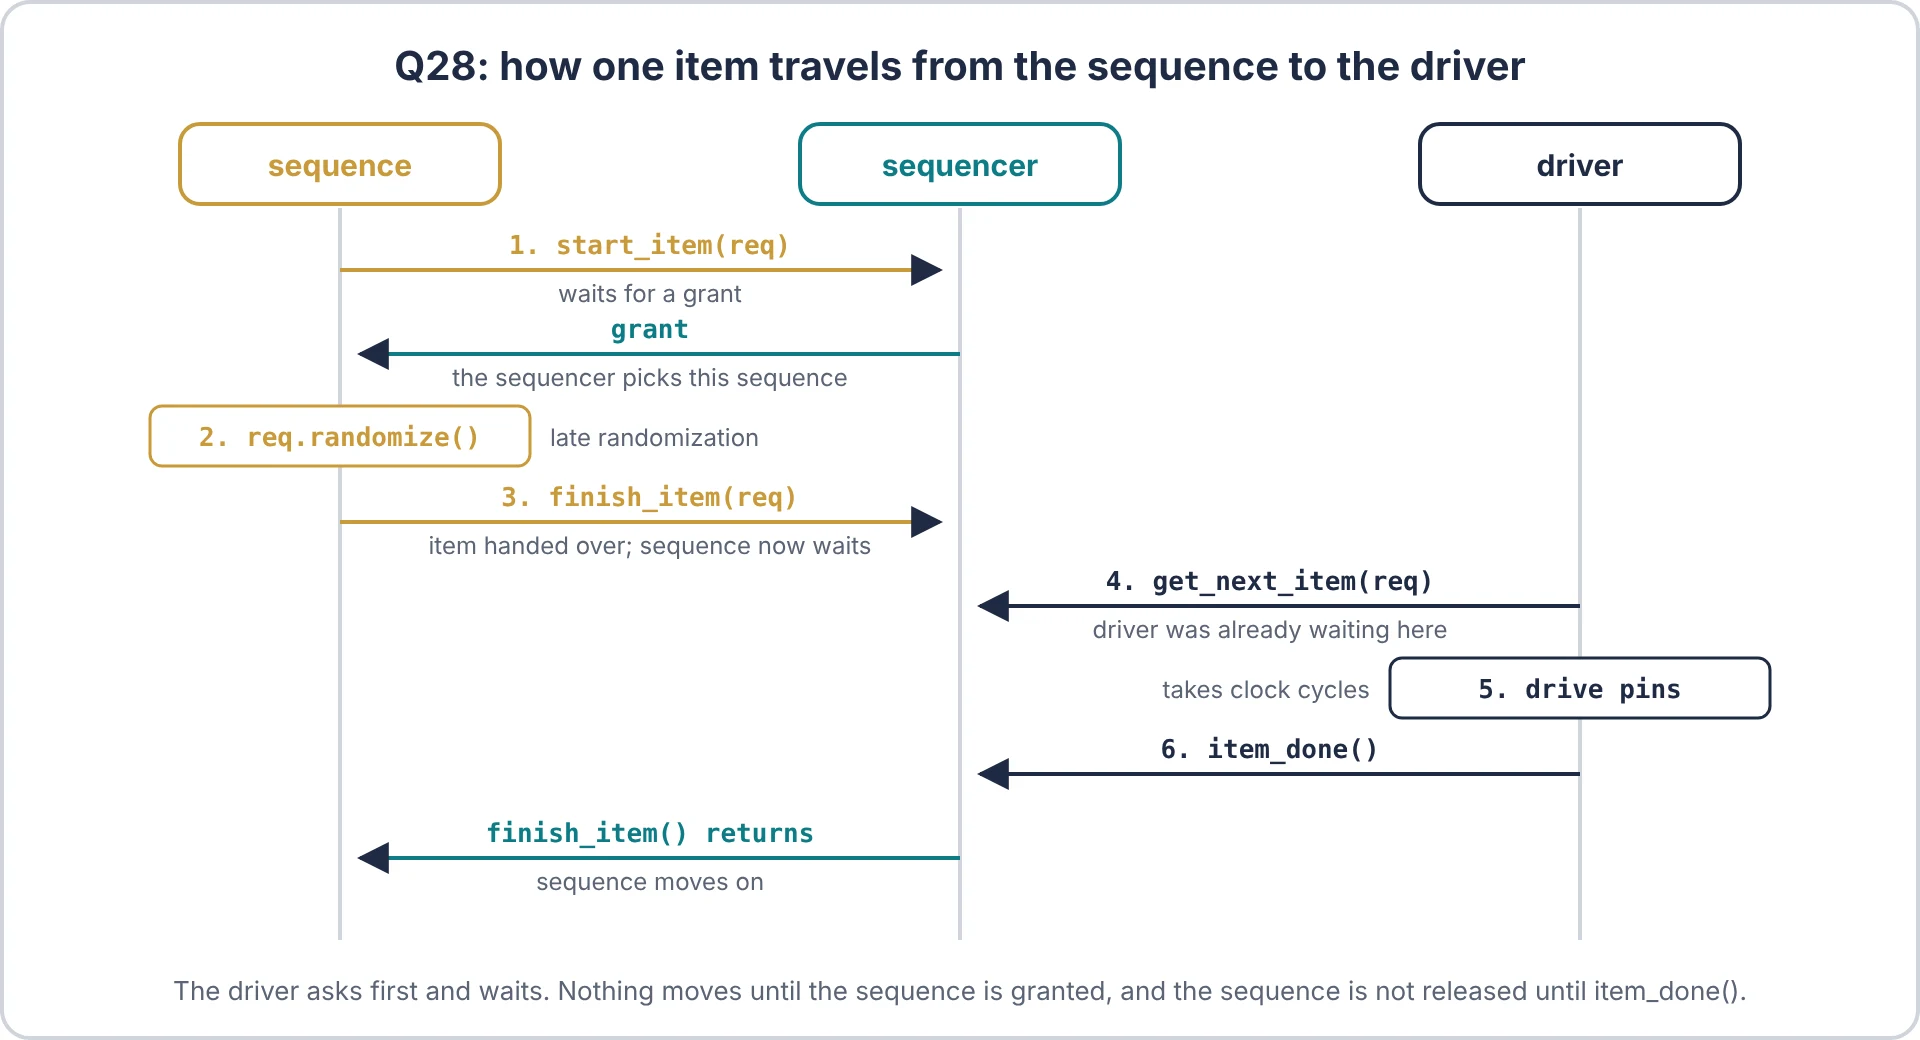
- The test starts
write_read_seqon the sequencer, under a raised objection so the simulation does not end. - The sequence creates a
bus_itemthrough the factory, waits instart_item()until the sequencer grants it, randomizes it (write 0xCAFE to 0x100), and sends it withfinish_item(). - The sequencer hands the item to the driver through
seq_item_port. - The driver puts address, data, write enable and valid on the pins through a clocking block, then calls
item_done(), which releasesfinish_item()in the sequence. - The DUT stores 0xCAFE at address 0x100 on the next clock edge.
- The monitor sees
valid, rebuilds a freshbus_itemfrom the pins, and callsap.write(). - The analysis port copies the handle to every subscriber: the scoreboard updates its model, the coverage collector samples its covergroup.
- When the read comes back one cycle later, the monitor publishes it with the read data, and the scoreboard compares it with the model.
Notice that the scoreboard never sees the driver’s item. It only trusts what the monitor saw on the pins. That is deliberate: if the driver has a bug, a scoreboard fed by the driver would happily agree with it.
The factory and the config database in one paragraph each
Factory: every component and item is created with type_id::create(), never new(). That lets a test say “wherever the env asks for a bus_item, give it a small_addr_item instead” without editing the env. See the UVM factory.
Config database: uvm_config_db is a lookup table keyed by hierarchy path and name. The top module puts the virtual interface in; the driver and monitor take it out in build_phase. See uvm_config_db and uvm_resource_db.
RTL and verification perspective: how does a UVM testbench connect to the DUT?
Classes cannot have ports, so they cannot connect to a module directly. The bridge has three steps:
- Declare a SystemVerilog interface that bundles the DUT signals, and instantiate it in
tb_topnext to the DUT. - Put a handle to that interface (a virtual interface) into
uvm_config_dbbeforerun_test(). - In
build_phase, the driver and monitor get the handle and use it to drive and sample signals.
Read more on why we need a virtual interface and passing it through uvm_config_db.
From the RTL side, three details decide whether your testbench is trustworthy:
- Clocking blocks remove races. The driver drives a little after the edge and the monitor samples just before it (
#1step). Without this, testbench and RTL can update the same signal in the same time step and you get results that change between simulators. - Modports state intent. A
DRVview can drive inputs, aMONview can only read. A monitor that drives a signal is a bug the compiler can catch for you. - Reset is part of the protocol. Drivers must hold outputs idle during reset; monitors must drop half-built transactions when reset hits. Most “random” first-week failures are reset handling.
A good habit from the old series still holds: before writing any testbench code, say in one sentence what the block does. That sentence becomes your scoreboard.
Where each piece sits in the UVM environment
The hierarchy is a tree with fixed names. run_test() always creates the test as uvm_test_top. Every other path hangs off it, which is why config paths like "uvm_test_top.env.agt.*" work.
| Level | What it holds | Who builds it | Reused at the next level? |
|---|---|---|---|
| tb_top (module) | Clock, reset, interfaces, DUT, bind statements | Elaboration | No, every level has its own top |
| Test | Env, config objects, sequence choice | run_test() | No, tests are level specific |
| Env | Agents, scoreboard, coverage, virtual sequencer, RAL model | Test | Yes, as a sub-env |
| Agent | Sequencer, driver, monitor (monitor only when passive) | Env | Yes, often switched to passive |
| Scoreboard and coverage | Reference model, covergroups | Env | Yes, unchanged |
Three architecture patterns show up on every real project:
- Active to passive: at SoC level, the real CPU or another block drives the bus. Set the agent to
UVM_PASSIVEand it keeps only its monitor. Your scoreboard and coverage keep working unchanged. - Env inside env: a chip-level env instantiates several block envs. Each still builds its own agents and checkers.
- Virtual sequences: when several agents must act together, a virtual sequence on a virtual sequencer coordinates them. See virtual sequences and sequencers and m_sequencer vs p_sequencer.
Register access usually adds a RAL model to the env, with an adapter and predictor tied to the bus agent. See the UVM RAL overview. Since UVM-MS 1.0 (2025), analog pins can also be reached through a standard MS bridge and proxy, using the same agent idea.
Build a UVM testbench step by step (working example)
Tested on VCS: every code block in these 12 steps was put into one file and run on Synopsys VCS 2025.06 with UVM 1.2. The real output is under “Running it” below.
We will verify a tiny memory: write data to an address, read it back one cycle later. Put the classes in one package file (bus_pkg.sv) in the order shown, and compile it with the interface, DUT, assertions and top module.
This is the same bottom-up order the old four-part series used: interface, item, driver and sequencer, then monitor, agent, scoreboard and env, then test and top. Each step is small enough to compile on its own.
Step 1: The interface and the DUT
// bus_if.sv : the "road" between testbench and DUT
`timescale 1ns/1ps
interface bus_if (input logic clk);
  logic        rst_n;
  logic        valid;   // 1 = a request this cycle
  logic        we;      // 1 = write, 0 = read
  logic [15:0] addr;
  logic [31:0] wdata;
  logic [31:0] rdata;   // read data, valid when rvalid = 1
  logic        rvalid;  // 1 = rdata answers the read from the previous cycle

  // Driver view: drive 1ns after the edge, sample just before it
  clocking drv_cb @(posedge clk);
    default input #1step output #1;
    output valid, we, addr, wdata;
    input  rdata, rvalid;
  endclocking

  // Monitor view: sample only, never drive
  clocking mon_cb @(posedge clk);
    default input #1step;
    input valid, we, addr, wdata, rdata, rvalid;
  endclocking

  modport DRV (clocking drv_cb, input rst_n);
  modport MON (clocking mon_cb, input rst_n);
endinterface
// mem_dut.sv : a 4K-word memory. Write on the clock edge,
// read data returns one cycle after the read request.
`timescale 1ns/1ps
module mem_dut (
input logic clk,
input logic rst_n,
input logic valid,
input logic we,
input logic [15:0] addr,
input logic [31:0] wdata,
output logic [31:0] rdata,
output logic rvalid
);
logic [31:0] mem [0:4095];
initial foreach (mem[i]) mem[i] = '0; // known start state for this example
always @(posedge clk or negedge rst_n) begin
if (!rst_n) begin
rvalid <= 1'b0;
rdata <= '0;
end else begin
rvalid <= valid && !we;
if (valid && we) mem[addr[11:0]] <= wdata;
if (valid && !we) rdata <= mem[addr[11:0]];
end
end
endmoduleStep 2: The sequence item (the parcel)
// bus_item: one bus transfer. Lives inside bus_pkg.
class bus_item extends uvm_sequence_item;
  rand bit [15:0] addr;
  rand bit [31:0] data;      // write data, or read data filled in by the monitor
  rand bit        is_write;

  constraint c_addr { addr inside {[16'h0000:16'h0FFF]}; }  // legal 4K window
  constraint c_rd   { !is_write -> data == 0; }             // reads carry no data
  constraint c_order { solve is_write before data; }       // without this, almost every item is a write

  `uvm_object_utils(bus_item)

  function new(string name = "bus_item");
    super.new(name);
  endfunction

  // Hand-written helpers: faster than field macros, and easy to read in logs
  virtual function void do_copy(uvm_object rhs);
    bus_item t;
    super.do_copy(rhs);
    if (!$cast(t, rhs)) `uvm_fatal("CAST", "do_copy: wrong type")
    addr = t.addr; data = t.data; is_write = t.is_write;
  endfunction

  virtual function bit do_compare(uvm_object rhs, uvm_comparer comparer);
    bus_item t;
    if (!$cast(t, rhs)) return 0;
    return super.do_compare(rhs, comparer) &&
           addr == t.addr && data == t.data && is_write == t.is_write;
  endfunction

  virtual function string convert2string();
    return $sformatf("%s addr=0x%04h data=0x%08h",
                     is_write ? "WR" : "RD", addr, data);
  endfunction
endclass
Why c_order? Without it, the solver picks uniformly from every legal combination. A write can carry about 4.3 billion data values and a read only one (data = 0), so reads almost never happen. On VCS, the first run without this line made 247 writes and 0 reads. solve is_write before data picks read or write first, 50/50, then the data.
The constraints live with the item, so every sequence gets legal traffic automatically. The old series used `uvm_field_int macros here. They still work, but hand-written do_copy, do_compare and convert2string are faster in big regressions and easier to debug.
Real protocols rarely send single beats. Here is the same idea for a burst, kept from the original architecture post, showing how one item describes many beats while staying legal:
class burst_item extends uvm_sequence_item;
  rand bit [15:0]   base_addr;
  rand int unsigned len;          // number of beats
  rand bit [31:0]   payload[];    // one entry per beat (variable-size array)

  constraint c_len  { len inside {[1:8]}; }
  constraint c_size { payload.size() == len; }
  constraint c_win  { base_addr + len <= 16'h1000; }   // whole burst stays in range

  `uvm_object_utils(burst_item)
  function new(string name = "burst_item"); super.new(name); endfunction
endclass
The c_win constraint uses the random len to keep the whole burst inside the window. Put that math in a constraint and no sequence can create an illegal burst by accident.
Step 3: The sequences (what to send)
// Directed: write a known value, then read it back
class write_read_seq extends uvm_sequence #(bus_item);
  `uvm_object_utils(write_read_seq)
  function new(string name = "write_read_seq"); super.new(name); endfunction

  task body();
    bus_item item;
    item = bus_item::type_id::create("item");
    start_item(item);
    if (!item.randomize() with { is_write == 1; addr == 16'h0100; data == 32'h0000_CAFE; })
      `uvm_fatal("RAND", "write item failed to randomize")
    finish_item(item);

    item = bus_item::type_id::create("item");
    start_item(item);
    if (!item.randomize() with { is_write == 0; addr == 16'h0100; })
      `uvm_fatal("RAND", "read item failed to randomize")
    finish_item(item);
  endtask
endclass

// Random: n_items legal transfers, mixed reads and writes
class random_seq extends uvm_sequence #(bus_item);
  `uvm_object_utils(random_seq)
  rand int unsigned n_items;
  constraint c_n { n_items inside {[200:500]}; }
  function new(string name = "random_seq"); super.new(name); endfunction

  task body();
    repeat (n_items) begin
      bus_item item = bus_item::type_id::create("item");
      start_item(item);
      if (!item.randomize()) `uvm_fatal("RAND", "random item failed")
      finish_item(item);
    end
  endtask
endclass
Always check the return value of randomize(). A failed randomize leaves the old values in place and your test quietly sends the same transfer again. More on directed vs constrained-random testing.
Step 4: The sequencer (the counter queue)
For most agents you do not write a sequencer class. A typedef is enough: typedef uvm_sequencer #(bus_item) bus_sequencer;. It already knows how to arbitrate between sequences and hand items to the driver. See sequencer and driver communication and sequence arbitration.
Step 5: The driver (the van)
class bus_driver extends uvm_driver #(bus_item);
  `uvm_component_utils(bus_driver)
  virtual bus_if vif;

  function new(string name, uvm_component parent); super.new(name, parent); endfunction

  function void build_phase(uvm_phase phase);
    super.build_phase(phase);
    if (!uvm_config_db#(virtual bus_if)::get(this, "", "vif", vif))
      `uvm_fatal("NOVIF", {"virtual interface not set for ", get_full_name()})
  endfunction

  task run_phase(uvm_phase phase);
    vif.drv_cb.valid <= 1'b0;
    vif.drv_cb.we    <= 1'b0;                 // drive known idle values, not X
    vif.drv_cb.addr  <= '0;
    vif.drv_cb.wdata <= '0;
    @(posedge vif.rst_n);                     // hold idle until reset is released
    forever begin
      @(vif.drv_cb);
      seq_item_port.try_next_item(req);       // non-blocking: idle if nothing to send
      if (req == null) begin
        vif.drv_cb.valid <= 1'b0;
        continue;
      end
      vif.drv_cb.valid <= 1'b1;
      vif.drv_cb.we    <= req.is_write;
      vif.drv_cb.addr  <= req.addr;
      vif.drv_cb.wdata <= req.data;
      `uvm_info("DRV", req.convert2string(), UVM_HIGH)
      seq_item_port.item_done();              // releases finish_item() in the sequence
    end
  endtask
endclass
The three idle lines matter too. Without them, we stays X while the bus is idle, and the a_ctrl_known assertion from the SVA section fires on the first clock after reset (it did, at 45 ns, on VCS).
The uvm_fatal in build_phase matters. Without it, a missing interface shows up later as a null handle crash deep in run_phase, which is much harder to read.
Two driver bugs show up again and again. First, forgetting item_done(), which hangs the sequence forever. Second, driving signals without a clock edge or clocking block, which races against the design.
Step 6: The monitor (the doorbell camera)
class bus_monitor extends uvm_monitor;
  `uvm_component_utils(bus_monitor)
  virtual bus_if vif;
  uvm_analysis_port #(bus_item) ap;           // broadcast channel

  function new(string name, uvm_component parent);
    super.new(name, parent);
    ap = new("ap", this);
  endfunction

  function void build_phase(uvm_phase phase);
    super.build_phase(phase);
    if (!uvm_config_db#(virtual bus_if)::get(this, "", "vif", vif))
      `uvm_fatal("NOVIF", {"virtual interface not set for ", get_full_name()})
  endfunction

  task run_phase(uvm_phase phase);
    bus_item rd_pending;                      // read waiting for its data
    forever begin
      @(vif.mon_cb);
      if (!vif.rst_n) begin rd_pending = null; continue; end

      // 1) rvalid this cycle answers the read seen on the previous edge
      if (vif.mon_cb.rvalid && rd_pending != null) begin
        rd_pending.data = vif.mon_cb.rdata;
        ap.write(rd_pending);
        rd_pending = null;
      end

      // 2) a new request this cycle
      if (vif.mon_cb.valid) begin
        bus_item t = bus_item::type_id::create("t");
        t.addr     = vif.mon_cb.addr;
        t.is_write = vif.mon_cb.we;
        t.data     = vif.mon_cb.we ? vif.mon_cb.wdata : '0;
        if (t.is_write) ap.write(t);          // writes are complete now
        else            rd_pending = t;       // reads finish next cycle
      end
    end
  endtask
endclass
The monitor builds a new item every time. Never reuse one item object and send it twice: the scoreboard may still hold the first handle, and you will change its data under its feet.
Step 7: The agent (one local branch)
typedef uvm_sequencer #(bus_item) bus_sequencer;

class bus_agent extends uvm_agent;
  `uvm_component_utils(bus_agent)
  bus_sequencer sqr;
  bus_driver    drv;
  bus_monitor   mon;
  uvm_analysis_port #(bus_item) ap;           // re-exports the monitor's port

  function new(string name, uvm_component parent); super.new(name, parent); endfunction

  function void build_phase(uvm_phase phase);
    super.build_phase(phase);                 // reads is_active from config
    mon = bus_monitor::type_id::create("mon", this);
    if (get_is_active() == UVM_ACTIVE) begin
      sqr = bus_sequencer::type_id::create("sqr", this);
      drv = bus_driver::type_id::create("drv", this);
    end
  endfunction

  function void connect_phase(uvm_phase phase);
    ap = mon.ap;
    if (get_is_active() == UVM_ACTIVE)
      drv.seq_item_port.connect(sqr.seq_item_export);
  endfunction
endclass
Step 8: The scoreboard (the claims desk)
class bus_scoreboard extends uvm_scoreboard;
  `uvm_component_utils(bus_scoreboard)
  uvm_analysis_imp #(bus_item, bus_scoreboard) item_imp;

  bit [31:0]   model [bit [11:0]];             // reference model: address -> data
  int unsigned n_writes, n_match, n_mismatch;

  function new(string name, uvm_component parent);
    super.new(name, parent);
    item_imp = new("item_imp", this);
  endfunction

  // Called by the monitor's analysis port for every observed transfer
  function void write(bus_item t);
    bit [11:0] a = t.addr[11:0];
    if (t.is_write) begin
      model[a] = t.data;
      n_writes++;
    end else begin
      bit [31:0] exp = model.exists(a) ? model[a] : 32'h0;
      if (t.data == exp) n_match++;
      else begin
        n_mismatch++;
        `uvm_error("SCB", $sformatf("Read 0x%03h: got 0x%08h, expected 0x%08h", a, t.data, exp))
      end
    end
  endfunction

  function void check_phase(uvm_phase phase);
    if (n_match + n_mismatch == 0)
      `uvm_error("SCB", "No reads were checked. Is the monitor connected?")
  endfunction

  function void report_phase(uvm_phase phase);
    `uvm_info("SCB", $sformatf("writes=%0d reads matched=%0d mismatched=%0d",
                               n_writes, n_match, n_mismatch), UVM_LOW)
  endfunction
endclass
The check_phase test catches the worst kind of bug: a scoreboard that was never fed and therefore never failed. A green test that checked nothing is the most expensive result in verification.
Step 9: The coverage collector (the auditors)
The full covergroup is in the functional coverage section below. The class shell is short: extend uvm_subscriber #(bus_item), and call cg.sample() from write().
Step 10: The environment (the whole company)
class bus_env extends uvm_env;
  `uvm_component_utils(bus_env)
  bus_agent      agt;
  bus_scoreboard scb;
  bus_coverage   cov;

  function new(string name, uvm_component parent); super.new(name, parent); endfunction

  function void build_phase(uvm_phase phase);
    super.build_phase(phase);
    agt = bus_agent::type_id::create("agt", this);
    scb = bus_scoreboard::type_id::create("scb", this);
    cov = bus_coverage::type_id::create("cov", this);
  endfunction

  function void connect_phase(uvm_phase phase);
    agt.ap.connect(scb.item_imp);
    agt.ap.connect(cov.analysis_export);
  endfunction
endclass
Step 11: The tests (head office)
class base_test extends uvm_test;
  `uvm_component_utils(base_test)
  bus_env env;

  function new(string name, uvm_component parent); super.new(name, parent); endfunction

  function void build_phase(uvm_phase phase);
    super.build_phase(phase);
    env = bus_env::type_id::create("env", this);
  endfunction

  function void end_of_elaboration_phase(uvm_phase phase);
    uvm_root::get().print_topology();
  endfunction

  // Child tests override only this
  virtual task run_seq();
    write_read_seq seq = write_read_seq::type_id::create("seq");
    seq.start(env.agt.sqr);
  endtask

  task run_phase(uvm_phase phase);
    // drain time lets the last read response reach the scoreboard
    phase.get_objection().set_drain_time(this, 50ns);
    phase.raise_objection(this);
    run_seq();
    phase.drop_objection(this);
  endtask
endclass

class random_test extends base_test;
  `uvm_component_utils(random_test)
  function new(string name, uvm_component parent); super.new(name, parent); endfunction
  virtual task run_seq();
    random_seq seq = random_seq::type_id::create("seq");
    if (!seq.randomize()) `uvm_fatal("RAND", "random_seq failed")
    seq.start(env.agt.sqr);
  endtask
endclass

// Factory override: same env, same sequence, but addresses squeezed into 16 words
// so writes and reads collide on the same locations much more often.
class small_addr_item extends bus_item;
  `uvm_object_utils(small_addr_item)
  constraint c_small { addr inside {[0:15]}; }
  function new(string name = "small_addr_item"); super.new(name); endfunction
endclass

class collide_test extends random_test;
  `uvm_component_utils(collide_test)
  function new(string name, uvm_component parent); super.new(name, parent); endfunction
  function void build_phase(uvm_phase phase);
    bus_item::type_id::set_type_override(small_addr_item::get_type());
    super.build_phase(phase);
  endfunction
endclass
The collide_test shows why the factory matters. Not one line of the env or sequence changed, yet every item is now a small_addr_item, because the sequence creates items with type_id::create().
Step 12: The package and the top module (the building)
// bus_pkg.sv
package bus_pkg;
  timeunit 1ns; timeprecision 1ps;           // so "50ns" means the same everywhere
  import uvm_pkg::*;
  `include "uvm_macros.svh"
  // paste or `include the classes in this order:
  // bus_item, burst_item, write_read_seq, random_seq, bus_driver, bus_monitor,
  // bus_agent, bus_scoreboard, bus_coverage, bus_env, base_test, random_test,
  // small_addr_item, collide_test
endpackage

// tb_top.sv
`timescale 1ns/1ps
module tb_top;
  import uvm_pkg::*;
  `include "uvm_macros.svh"
  import bus_pkg::*;

  logic clk = 0;
  always #5 clk = ~clk;                       // 100 MHz

  bus_if  bif (clk);
  mem_dut dut (.clk(clk), .rst_n(bif.rst_n), .valid(bif.valid), .we(bif.we),
               .addr(bif.addr), .wdata(bif.wdata), .rdata(bif.rdata), .rvalid(bif.rvalid));

  initial begin
    bif.rst_n = 1'b0;
    repeat (5) @(posedge clk);
    bif.rst_n = 1'b1;
  end

  initial begin
    // one wildcard set reaches both driver and monitor
    uvm_config_db#(virtual bus_if)::set(null, "uvm_test_top.env.agt.*", "vif", bif);
    run_test("base_test");                    // +UVM_TESTNAME on the command line wins
  end
endmodule
Running it and what a good run looks like
# Compile bus_if.sv, mem_dut.sv, bus_sva.sv, bus_pkg.sv, tb_top.sv with your
# simulator's UVM switch, then pick the test at run time (no recompile):
<sim> +UVM_TESTNAME=random_test +UVM_VERBOSITY=UVM_LOW
<sim> +UVM_TESTNAME=collide_test +UVM_VERBOSITY=UVM_LOW
Using +UVM_TESTNAME on the command line is better than hard coding the test in run_test(): one build runs every test. print_topology() prints this tree on Synopsys VCS 2025.06 (other simulators lay out the columns differently):
--------------------------------------------------------------
Name                       Type                    Size  Value
--------------------------------------------------------------
uvm_test_top               random_test             -     @341
  env                      bus_env                 -     @354
    agt                    bus_agent               -     @363
      drv                  bus_driver              -     @567
        rsp_port           uvm_analysis_port       -     @586
        seq_item_port      uvm_seq_item_pull_port  -     @576
      mon                  bus_monitor             -     @411
        ap                 uvm_analysis_port       -     @420
      sqr                  uvm_sequencer           -     @430
        rsp_export         uvm_analysis_export     -     @439
        seq_item_export    uvm_seq_item_pull_imp   -     @557
        arbitration_queue  array                   0     -
        lock_queue         array                   0     -
        num_last_reqs      integral                32    'd1
        num_last_rsps      integral                32    'd1
    cov                    bus_coverage            -     @391
      analysis_imp         uvm_analysis_imp        -     @400
    scb                    bus_scoreboard          -     @372
      item_imp             uvm_analysis_imp        -     @381
--------------------------------------------------------------
A healthy run shows three things: no UVM_ERROR or UVM_FATAL in the report summary, a scoreboard line with zero mismatches and a non-zero match count, and coverage moving toward 100%.
To prove your checker works, break the DUT on purpose (for example, store wdata + 1) and confirm the scoreboard fires. A checker you never saw fail is a checker you cannot trust.
Tested on VCS (Synopsys VCS 2025.06, UVM 1.2, 12 Nov 2026), with every code block on this page in one file:
| Run | Scoreboard line | UVM_ERROR |
|---|---|---|
random_test | writes=107 reads matched=140 mismatched=0 | 0 |
collide_test | writes=117 reads matched=130 mismatched=0 | 0 |
random_test, DUT broken on purpose (stores wdata + 1) | writes=107 reads matched=137 mismatched=3 | 3 |
No assertion fired in the two clean runs. And here is the checker failing on purpose, which is the run that proves it works:
UVM_ERROR testbench.sv(323) @ 1855000: uvm_test_top.env.scb [SCB] Read 0x256: got 0x452f4c87, expected 0x452f4c86
UVM_ERROR testbench.sv(323) @ 2145000: uvm_test_top.env.scb [SCB] Read 0x5d5: got 0x67c1f7de, expected 0x67c1f7dd
UVM_ERROR testbench.sv(323) @ 2445000: uvm_test_top.env.scb [SCB] Read 0x6b8: got 0x454519ed, expected 0x454519ec
Every bad read is off by exactly 1: the planted bug. But look at the count. The broken DUT corrupted all 107 writes, and random_test caught only 3. With 4,096 addresses, most reads land on a location that was never written, and that reads 0 in both the DUT and the model. That is why collide_test squeezes addresses into 16 words. A passing random test is not proof on its own.
Two fixes came out of running this example for real, both already in the code above: the c_order constraint in step 2 (before it, every item was a write, and the scoreboard’s check_phase guard reported “No reads were checked”) and the idle values in the step 5 driver (before them, a_ctrl_known fired at 45 ns). Both are good examples of why you run a testbench before you trust it.
SVA assertions that belong next to a UVM testbench
The scoreboard checks data end to end. Assertions check timing rules cycle by cycle, right where they break. You want both. Keep protocol assertions in a separate module and attach them with bind, so the RTL stays untouched and the same checks run in simulation and formal.
// bus_sva.sv : protocol rules for bus_if, bound into the DUT
module bus_sva (
  input logic        clk, rst_n, valid, we, rvalid,
  input logic [15:0] addr,
  input logic [31:0] wdata, rdata
);
  default clocking @(posedge clk); endclocking
  default disable iff (!rst_n);

  // 1. Control signals are never X or Z out of reset
  a_ctrl_known:  assert property (!$isunknown({valid, we}))
                 else $error("valid/we unknown");

  // 2. Every request stays inside the 4K-word window
  a_addr_range:  assert property (valid |-> addr < 16'h1000);

  // 3. Write data is known on every write
  a_wdata_known: assert property (valid && we |-> !$isunknown(wdata));

  // 4. Every read gets its response exactly one cycle later
  a_rd_resp:     assert property (valid && !we |=> rvalid);

  // 5. No response without a read in the previous cycle
  a_no_spurious: assert property (rvalid |-> $past(valid && !we));

  // 6. Read data is known whenever it is valid
  a_rdata_known: assert property (rvalid |-> !$isunknown(rdata));

  // Covers prove the interesting cases really happened
  c_wr_then_rd:  cover property (valid && we ##1 valid && !we);
  c_b2b_reads:   cover property (valid && !we ##1 valid && !we);
endmodule

// In tb_top.sv (or a separate bind file): port names match, so .* works
bind mem_dut bus_sva u_bus_sva (.*);
Two notes from real debug. $past looks at the previous clock, so assertion 5 needs a clean reset to start from. And a cover that never hits is a stimulus hole, not a passing check. More examples: assertions with examples, immediate vs concurrent assertions and SVA bind.
Functional coverage for a UVM testbench
Coverage answers one question: did we actually test what the plan says? In a UVM testbench it lives in a subscriber hooked to the monitor, never in the driver, because only the monitor knows what really happened on the pins.
class bus_coverage extends uvm_subscriber #(bus_item);
  `uvm_component_utils(bus_coverage)
  bus_item tr;

  covergroup cg;
    option.per_instance = 1;
    cp_op: coverpoint tr.is_write {
      bins read  = {0};
      bins write = {1};
    }
    cp_addr: coverpoint tr.addr[11:0] {
      bins first     = {12'h000};
      bins low       = {[12'h001:12'h0FF]};
      bins mid       = {[12'h100:12'hEFF]};
      bins high      = {[12'hF00:12'hFFE]};
      bins last      = {12'hFFF};
    }
    cp_data: coverpoint tr.data {
      bins zero      = {32'h0};
      bins all_ones  = {32'hFFFF_FFFF};
      bins walking[] = {32'h1, 32'h2, 32'h4, 32'h8000_0000};
      bins other     = {[32'h1:32'hFFFF_FFFE]};
    }
    cp_order: coverpoint tr.is_write {        // what came before this transfer
      bins wr_then_rd = (1 => 0);
      bins rd_then_wr = (0 => 1);
      bins wr_wr      = (1 => 1);
      bins rd_rd      = (0 => 0);
    }
    x_op_addr: cross cp_op, cp_addr;          // 2 x 5 = 10 bins
  endgroup

  function new(string name, uvm_component parent);
    super.new(name, parent);
    cg = new();
  endfunction

  function void write(bus_item t);
    tr = t;
    cg.sample();
  endfunction
endclass
That is 28 bins in total (2 + 5 + 7 + 4 + 10 cross bins), small enough to close by hand and big enough to catch a sequence that never touches the last word of memory. The first and last bins exist because address boundary bugs are the classic memory bug.
Two rules from the old coverage guidelines still apply: tie every coverpoint to a line in the verification plan, and never add bins you do not intend to close. See functional coverage guidelines, coverage options and types of coverage metrics.
Checker, monitor and scoreboard strategy
Where you put checking decides how much of your testbench survives the move to the next level. Here is a split that works on real projects.
| Check | Where it lives | Why there |
|---|---|---|
| Cycle-level protocol rules | SVA bound to the interface or DUT | Fires on the exact cycle; also usable in formal |
| Transaction rebuild | Monitor | Only place that sees the pins; reused when passive |
| Data correctness | Scoreboard with a reference model | Independent of how stimulus was made |
| End of test checks | Scoreboard check_phase | Catches leftover items and empty scoreboards |
| What was exercised | Coverage subscriber | Fed by the monitor, so it measures reality |
| Register values | RAL model with predictor | Mirrors the DUT registers from bus traffic |
Pick the scoreboard style to match the design:
- In-order: a queue of expected items, compare front to front. Fits FIFOs, simple pipelines and this memory.
- Out-of-order: an associative array keyed by ID or address. Fits AXI-style interconnects with IDs.
- Predictor plus comparator: one component computes expected output from input monitor items, another compares with output monitor items. Fits blocks with separate input and output interfaces.
Keep the reference model as simple as you can. If it is as complex as the RTL, you will copy the same bugs into both.
Debug and failure triage in a UVM testbench
Most UVM architecture bugs are wiring bugs, and the library has built-in switches to find them. All of these are standard UVM command-line plusargs.
| Symptom | Likely cause | First thing to try |
|---|---|---|
| Test ends at time 0 with nothing driven | No objection raised in run_phase | +UVM_OBJECTION_TRACE |
| Null handle crash in driver or monitor | Virtual interface path in config_db does not match | +UVM_CONFIG_DB_TRACE and check the set path |
| Factory override does nothing | Object created with new(), or override set after creation | Call factory.print() at end of elaboration |
| Sequence hangs forever | Driver missing item_done(), or no driver connected | Check print_topology() and the connect_phase |
| Simulation never ends | An objection raised but never dropped | +UVM_OBJECTION_TRACE and +UVM_TIMEOUT |
| Scoreboard passes but bug escapes | Scoreboard fed by driver, or never fed at all | Inject a DUT bug; check the match count is non-zero |
| Phases out of order in log | Missing super.build_phase() call | +UVM_PHASE_TRACE |
| Agent always active at SoC level, or always passive | is_active set on wrong path or super.build_phase not called | Print get_is_active() in the agent |
A simple triage order saves hours: read the first error, not the last; check the topology print; check config and factory traces; then open waves at the time of the first error. When a scoreboard fires, put the expected and actual values in the message, as in the example above, so the log alone often tells you the story.
For a full method, read the practical verification debug guide and debugging is an art. To make noisy logs quieter without hiding real errors, see the uvm_report_catcher example.
How AI helps you master UVM testbench architecture
UVM has a lot of boilerplate: factory macros, constructors, config gets, port connections. That is exactly the part AI assistants are good at. The part they are bad at is knowing what your design is supposed to do. Use AI for the first, and keep the second for yourself.
Here is what changed in 2026. All three big EDA vendors now ship agentic tools aimed at this work:
- Cadence ChipStack AI Super Agent (February 2026) generates testbenches, test plans and verification code, runs simulation and formal, and builds a “Mental Model” of the design from specs and RTL. Cadence reports up to 10x productivity from customers, and Tenstorrent reported up to 4x less verification time across three blocks. These are vendor and customer claims.
- Synopsys AgentEngineer (March 2026) is a multi-agent workflow that, among other steps, generates unit-level testbenches. Synopsys reports 2x productivity, up to 5x in select cases.
- Siemens Questa One Agentic Toolkit (February 2026, early access) includes a Verification Planning Agent and a Debug Agent that reads waveforms, assertions, coverage and logs together.
Open research points the same way, with useful limits. The UVM² framework (arXiv, first posted April 2025, revised April 2026) generated UVM testbenches that reached 87.44% average code coverage and 89.58% average functional coverage on its benchmarks. A DVCon Europe 2025 paper notes that earlier work found open-weight LLMs struggle with deeper design understanding in UVM testbench generation.
So the honest picture is this: AI writes a decent skeleton fast. Whether it checks the right thing is still on you. For the bigger picture, read AI in verification: methodology.
Copy-paste prompts for UVM testbench work
1) LEARN
"Explain UVM testbench architecture to me as a verification engineer who knows
SystemVerilog but not UVM. Use one bus interface as the example. For each of:
sequence item, sequence, sequencer, driver, monitor, agent, scoreboard, env, test,
say which UVM base class it extends, which phase builds it, and who it talks to."

2) FIRST-DRAFT AGENT
"Write a UVM agent for this interface: <paste interface, NOT confidential RTL>.
Requirements: clocking blocks for driver and monitor, is_active support, monitor
publishes one item per completed transfer through an analysis port, uvm_fatal if
the virtual interface is missing, type_id::create everywhere. No field macros;
write do_copy, do_compare and convert2string by hand."

3) REVIEW
"Review this UVM code for architecture mistakes. Check: checks inside driver or
monitor, new() instead of type_id::create, missing super.build_phase, objections,
config_db paths that will not match the hierarchy, monitor reusing one item
object, and races between driver and DUT. List each issue with line and fix."

4) LOG DEBUG
"Here is a UVM log excerpt with the first UVM_ERROR and 30 lines before it,
plus the print_topology output. Tell me the three most likely root causes, in
order, and the exact plusarg or print I should add to confirm each one."

5) COVERAGE HOLES
"Here is my covergroup and the coverage report showing these empty bins: <list>.
For each empty bin, say whether it is a stimulus hole, a constraint that blocks
it, or a bin that should not exist. Then write a directed sequence that hits it."

6) SVA DRAFT
"From this protocol description, write SVA properties with disable iff on reset,
one assert and one cover per rule, and a bind statement. Mark any rule you are
not sure about with a TODO instead of guessing."
What to give AI and what to check by hand
| Task | Good for AI | Must check by hand |
|---|---|---|
| Agent, env and test boilerplate | Yes: macros, constructors, phases, connects | Hierarchy names match your config_db paths |
| Sequence item and constraints | First draft of fields and simple constraints | Every constraint against the spec, including corner values |
| Driver and monitor timing | Clocking block skeleton | Exact cycle timing, reset, back-to-back transfers, in waves |
| Scoreboard reference model | Data structure and compare plumbing | The expected-value logic. This is the real checker. |
| SVA | Translating clear rules into syntax | Run each one in sim or formal; make sure it can fail |
| Coverage | Covergroup syntax and bin ideas | Bins match the verification plan; no bins you will waive |
| Log triage | Grouping errors, suggesting first suspects | Root cause in waves before you file or fix |
Guardrails
- Never trust an AI-written assertion or checker you have not seen fail. Inject a bug and watch it fire.
- Run every generated piece in simulation, and formal where it fits, before it goes in the repo.
- Do not paste confidential RTL, specs or logs into public AI tools. Use the tools your company has approved, and check company policy first.
- Keep the human review step. A wrong scoreboard that passes is worse than no scoreboard at all.
- Ask the AI to mark what it is unsure about. Guessing is the failure mode you need to see.
Common UVM architecture mistakes and limitations
| Mistake | What goes wrong | Fix |
|---|---|---|
| Checking logic inside the driver or monitor | Components cannot be reused; checks are scattered | Put all comparisons in the scoreboard |
Using new() instead of type_id::create() | Factory overrides silently do nothing | Always create through the factory |
No objection in run_phase | Test ends at time 0 | Raise before stimulus, drop after |
| Hard-coding the interface path | Testbench breaks when reused | Pass the virtual interface through uvm_config_db |
| Monitor drives a signal | Two drivers fight on the bus | Monitors only read; use a MON modport |
Forgetting super.build_phase() in the agent | is_active is never read, agent is always active | Call super.build_phase(phase) first |
| Stimulus written inside components | Traffic is tied to one project | Put stimulus in sequences |
| Scoreboard fed by the driver | Driver bugs are invisible | Feed scoreboards only from monitors |
| Reusing one item object in the monitor | Earlier items change after being sent | Create a new item per transaction |
UVM itself has limits worth knowing:
- Learning curve: phases, factory, config and TLM are a lot to learn at once. Build the small example above before a real project.
- Speed: class-based testbenches cost simulation time, especially with heavy field macros and per-cycle messages.
- Not the right tool for everything: deep control logic is often better proven with formal, and full-chip software flows with emulation.
- Open-source support is partial: as of October 2025, Verilator elaborates UVM 2017-1.0 with no patches, but UVM 2020 support was still planned and covergroup support was incomplete.
Regression and performance for UVM testbenches
A testbench that runs once is a demo. A testbench that runs 2,000 seeds a night is a product. A few habits make the difference:
- One build, many tests: pick tests with
+UVM_TESTNAMEand seeds with your simulator’s seed switch. Never recompile to change a test. - Quiet by default: run regressions at
UVM_LOWverbosity. Put per-transfer messages atUVM_HIGH, as the driver above does. - Skip field macros in hot items: hand-written
do_copyanddo_compareavoid the cost of the macro automation on every transfer. - Bound the run: set
+UVM_TIMEOUTand+UVM_MAX_QUIT_COUNTso a hung or failing seed does not waste a farm slot for hours. - Merge coverage across seeds and rank tests by what they add. Retire seeds that add nothing.
- Triage by first error signature: bucket failures by the ID and message of the first
UVM_ERROR, so 300 failing seeds become 4 bugs.
The architecture helps here too. Because tests only choose sequences and config, the regression list is just a list of test names and seed counts.
Best practices for UVM testbench architecture
- Write one sentence that says what the DUT does before writing any code. It becomes the scoreboard.
- Build bottom-up: interface, item, driver, sequencer, monitor, agent, scoreboard, env, test. Compile after each step.
- One agent per interface. One env per block. One test class per scenario.
- Create everything with
type_id::create(). - Pass interfaces and knobs through
uvm_config_dband config objects, never through hard-coded paths. - Use clocking blocks and modports in every interface.
- Feed scoreboards and coverage only from monitors.
- Check that the scoreboard checked something, in
check_phase. - Keep protocol checks in bound SVA, data checks in the scoreboard.
- Make every agent work in both active and passive mode from day one.
- Break the DUT on purpose once per checker and watch it fail.
- Keep stimulus in sequences and layer them; tests only pick and configure.
Project example: IP level (a 4K-word memory block)
Here is how the example above grows into a real IP testbench. The numbers are a worked example, not a measured project.
Plan: 14 verification plan items covering reads, writes, every address boundary, back-to-back mixes and reset in the middle of traffic. Tests: base_test, random_test, collide_test, plus a reset_test that pulls reset during random traffic.
A config object keeps the env reusable. The test fills it, the env reads it once:
class bus_env_cfg extends uvm_object;
  `uvm_object_utils(bus_env_cfg)
  uvm_active_passive_enum is_active    = UVM_ACTIVE;
  bit                     has_coverage = 1;
  bit                     has_scb      = 1;
  function new(string name = "bus_env_cfg"); super.new(name); endfunction
endclass

// In bus_env::build_phase
if (!uvm_config_db#(bus_env_cfg)::get(this, "", "cfg", cfg))
  `uvm_fatal("NOCFG", "bus_env_cfg not set")
uvm_config_db#(uvm_active_passive_enum)::set(this, "agt", "is_active", cfg.is_active);
agt = bus_agent::type_id::create("agt", this);
if (cfg.has_scb)      scb = bus_scoreboard::type_id::create("scb", this);
if (cfg.has_coverage) cov = bus_coverage::type_id::create("cov", this);
A sensible exit target for a block this size: 28 of 28 coverage bins hit, all 6 assertions passing with both covers hit, 500 random seeds clean, and the injected bug (wdata + 1) caught in the first seed.
Do not forget to guard the matching connects in connect_phase with the same has_scb and has_coverage flags.
Project example: subsystem level (DMA plus memory)
Now put the memory behind a small DMA engine. The subsystem has two interfaces: a register bus to program the DMA, and the memory bus we already have.
- Reuse:
bus_envdrops in unchanged as a sub-env, with its agent set toUVM_PASSIVE, because the DMA now drives the memory bus. The monitor, scoreboard and coverage keep working. - New: a register agent (active) and a RAL model to program source, destination and length.
- New: a subsystem scoreboard that predicts the memory writes from the programmed DMA descriptor.
- Coordination: a virtual sequence that programs the DMA through RAL, waits for done, then reads back memory.
class dma_vseq extends uvm_sequence;
  `uvm_object_utils(dma_vseq)
  `uvm_declare_p_sequencer(dma_vsequencer)   // gives typed access to sub-sequencers
  rand bit [11:0] src, dst;
  rand bit [7:0]  len;
  constraint c_len { len inside {[1:64]}; src + len <= 4096; dst + len <= 4096; }
  function new(string name = "dma_vseq"); super.new(name); endfunction

  task body();
    uvm_status_e st;
    p_sequencer.regmodel.dma.src.write(st, src);
    p_sequencer.regmodel.dma.dst.write(st, dst);
    p_sequencer.regmodel.dma.len.write(st, len);
    p_sequencer.regmodel.dma.ctrl.write(st, 1);         // start
    wait_for_done();                                     // poll status or wait for interrupt
  endtask

  virtual task wait_for_done();
    uvm_reg_data_t v;
    uvm_status_e   st;
    do p_sequencer.regmodel.dma.status.read(st, v); while (v[0] == 0);
  endtask
endclass
The key lesson at this level is that the block env cost almost nothing to reuse, because it never assumed it was the one driving. Interrupt handling patterns are in how to handle interrupts in UVM.
Project example: SoC level
At chip level, a CPU runs software and everything inside is driven by real RTL. The UVM testbench changes shape, but the architecture holds:
- Almost every block agent is passive. They become probes: monitors plus scoreboards plus coverage on internal buses.
- Only the chip pins stay active: external memory models, peripheral agents (UART, SPI, PCIe and so on) and reset and clock control.
- Software and UVM meet in the middle: C tests run on the CPU, and a mailbox or shared memory region lets UVM sequences and software sync up.
- Coverage shifts to integration: did every block see traffic, every interrupt route fire, every clock and power mode get used?
// soc_test::build_phase : flip every block agent to passive in one place
uvm_config_db#(uvm_active_passive_enum)::set(this, "env.mem_env.agt",  "is_active", UVM_PASSIVE);
uvm_config_db#(uvm_active_passive_enum)::set(this, "env.dma_env.reg_agt", "is_active", UVM_PASSIVE);
// chip pins stay active
uvm_config_db#(uvm_active_passive_enum)::set(this, "env.uart_agt", "is_active", UVM_ACTIVE);
This is where the architecture choice made on day one pays off. Read the full chip picture in the SoC verification flow and key areas in SoC verification. For scenario-level tests that run across UVM and software, see the Portable Stimulus (PSS) guide.
A real project story: the scoreboard that never failed
This is a composite story built from patterns seen across many projects, not one specific team.
A block team had a clean UVM testbench. Every nightly regression passed: 1,200 seeds, zero errors, coverage near 100%. The block went into the subsystem.
Two weeks into subsystem work, a data corruption bug showed up that should have been caught at block level. The block scoreboard had been fed from the driver’s analysis port, not the monitor’s. It was comparing the testbench’s intent with the testbench’s intent.
Worse, at subsystem level the agent was passive, so there was no driver and the scoreboard got nothing at all. It printed zero mismatches. Nobody noticed it also printed zero matches.
The fix took an hour: connect the scoreboard to the monitor, and add the check_phase rule that errors when nothing was checked. The block regression then failed on its first seed with the same corruption.
The cost was two weeks of schedule. The habit it left behind is the one in this article: watch every checker fail once, and make silence an error.
UVM testbench architecture interview questions
Draw a UVM testbench and explain each block.
Start from tb_top (clock, interface, DUT, run_test), then uvm_test_top, env, agent (sequencer, driver, monitor), scoreboard and coverage. Explain that stimulus goes down through the driver and observation comes up through the monitor’s analysis port.
What is the difference between uvm_object and uvm_component?
Components are built once in build_phase, have a parent and a hierarchy path, and take part in phases. Objects such as sequence items, sequences and config objects are created and discarded freely and have no place in the hierarchy.
Why is build_phase top-down and connect_phase bottom-up?
A parent must exist, and must set config, before it builds its children, so build goes down. Ports must exist on all children before anything is connected, so connect goes up after build is complete.
Why do we need a virtual interface?
Classes cannot have ports, so they cannot connect to module signals. A virtual interface is a handle to a real interface instance, passed through uvm_config_db, which lets drivers and monitors reach the pins.
What does the factory give you?
The ability to replace a class with a derived class from a test, without editing the env, as long as everything is created with type_id::create(). Examples: an error-injecting driver, or an item with tighter constraints.
Active vs passive agent?
An active agent builds sequencer, driver and monitor and drives the interface. A passive agent builds only the monitor and observes. You make an agent passive when real RTL drives that interface at a higher level.
Why should the scoreboard be fed by the monitor, not the driver?
Because the monitor reports what really happened on the pins. A scoreboard fed by the driver checks the testbench against itself, so driver bugs and protocol issues go unseen.
What happens if you forget to raise an objection?
run_phase ends immediately, at time zero, because no component asked the phase to stay open. The test passes having done nothing, which is why a non-zero match count check is useful.
What is the handshake between sequence, sequencer and driver?
The sequence calls start_item (wait for grant) and finish_item (send). The driver calls get_next_item or try_next_item to receive, drives the pins, and calls item_done, which unblocks finish_item.
When would you use a virtual sequence?
When a scenario needs several agents to act in a coordinated order, for example program a DMA over one bus and then check data on another. The virtual sequence runs on a virtual sequencer that holds handles to the real ones.
Where do assertions go in a UVM testbench?
Protocol assertions usually go in a separate module bound to the interface or DUT, so they run cycle by cycle and can be reused in formal. The scoreboard handles transaction-level data checks.
How do you prove your scoreboard works?
Inject a known bug into the DUT or with a factory override on the driver, run, and confirm the scoreboard reports a mismatch. Also make it error if it checked zero items.
For a longer set, see the UVM interview questions page.
Frequently asked questions (People Also Ask)
What are the main components of a UVM testbench?
The main components are the sequence item, sequence, sequencer, driver, monitor, agent, scoreboard, coverage collector, environment and test, plus a top module with the DUT and interface. Agents group the sequencer, driver and monitor for one interface; the env groups agents and checkers; the test configures the env and starts sequences.
What is the difference between a sequence and a sequencer?
A sequence is an object that decides what transactions to send and in what order. A sequencer is a component that queues those transactions, picks between competing sequences, and hands them one at a time to the driver. Sequences come and go during the run; the sequencer stays for the whole simulation.
Why does the monitor rebuild transactions the driver already sent?
Because the driver’s item is what the testbench intended, while the monitor’s item is what actually happened on the pins. Checking only real pin activity catches driver bugs and protocol errors, and the monitor keeps working when the agent is passive and there is no driver at all.
What is the difference between an active and a passive agent?
An active agent contains a sequencer, driver and monitor and drives the interface. A passive agent contains only the monitor and just observes. Block-level agents are usually active; the same agents are switched to passive at subsystem or SoC level when real RTL drives those signals.
Do I always need a scoreboard in a UVM testbench?
For any block that transforms or stores data, yes. Very simple blocks can sometimes be fully checked by assertions alone. But if your testbench has random stimulus and no scoreboard, most data bugs will pass silently, so treat a missing scoreboard as a risk, not a shortcut.
What is uvm_test_top?
uvm_test_top is the fixed instance name UVM gives to the test object that run_test() creates. Every component path in the testbench starts with it, for example uvm_test_top.env.agt.drv, which is why config_db paths and factory instance overrides refer to it. You never instantiate it yourself.
How do you pass a virtual interface to the driver in UVM?
In the top module, call uvm_config_db#(virtual bus_if)::set with a path that matches the agent, then call run_test(). In the driver’s and monitor’s build_phase, call uvm_config_db get with the same name and type, and raise uvm_fatal if it fails, so a wrong path stops the run at time zero.
Which UVM version should I use in 2026?
Use a library from the UVM 2020 series, which implements IEEE 1800.2-2020, the active standard. Accellera’s download page lists UVM 2020-3.2 with an August 2026 date. Older UVM 1.1d and 1.2 code mostly ports with small changes, mainly around deprecated APIs.
Can AI write a UVM testbench for me?
AI can write a usable first draft of agents, envs, sequences and covergroups, and 2026 tools from Cadence, Synopsys and Siemens go further. It cannot know your design intent, so the scoreboard model, timing and coverage plan must be reviewed and proven by you in simulation.
Summary
UVM testbench architecture is a simple idea applied strictly: small classes, each with one job, talking through fixed doors. Sequences decide what to send, drivers put it on pins, monitors read the pins back, scoreboards judge, coverage counts, envs hold it all and tests choose what to run.
The structure is not there to look tidy. It is there so the same monitor, scoreboard and coverage survive from block to subsystem to SoC, at a time when first-silicon success fell to 5% in the 2026 study. AI now writes much of the boilerplate. The checking, and the judgment behind it, is still the engineer’s job.
Quick revision notes
- Standard: IEEE 1800.2-2020; library: UVM 2020 series (2020-3.2 listed in August 2026); language: IEEE 1800-2023 SystemVerilog, free through the IEEE GET program.
- Objects: item, sequence, config. Components: sequencer, driver, monitor, agent, scoreboard, subscriber, env, test.
- build_phase top-down, connect_phase bottom-up, run_phase in parallel, check and report at the end.
- Virtual interface goes into uvm_config_db in tb_top, comes out in build_phase.
- start_item / finish_item in the sequence; get_next_item / item_done in the driver.
- Monitor writes to an analysis port; scoreboard and coverage subscribe.
- Active agent: sequencer, driver, monitor. Passive agent: monitor only.
- Create with type_id::create(), or the factory cannot help you.
- No objection, no simulation time.
- Clocking blocks: drive after the edge, sample with #1step.
Printable checklist
- [ ] One sentence describes what the DUT does
- [ ] Interface has clocking blocks and modports
- [ ] Every class registered with the factory and created with type_id::create()
- [ ] Driver and monitor raise uvm_fatal if the virtual interface is missing
- [ ] Driver calls item_done() for every item and holds idle in reset
- [ ] Monitor creates a new item per transfer and never drives
- [ ] Agent works in both UVM_ACTIVE and UVM_PASSIVE
- [ ] Scoreboard is fed only by monitors
- [ ] Scoreboard errors in check_phase if it checked nothing
- [ ] Protocol SVA bound to the interface or DUT, with covers
- [ ] Covergroup bins trace to the verification plan
- [ ] Test raises and drops objections, with a drain time
- [ ] Tests chosen with +UVM_TESTNAME; regression at UVM_LOW
- [ ] Every checker seen failing on an injected bug
Related reading
- AI in verification: methodology
- Practical verification debug guide
- Portable Stimulus (PSS) guide
- UVM phasing
- Concept of the UVM factory
- UVM TLM concepts
- Virtual sequences and sequencers
- How to end a UVM test: objections
- UVM RAL overview
- SoC verification flow
Learning path: from first agent to SoC testbench
- SystemVerilog classes, randomization and interfaces: directed vs constrained-random, virtual interfaces.
- UVM basics: phasing, factory, config_db, messaging.
- Build the working example on this page, then break the DUT and watch it fail.
- Stimulus depth: sequencer and driver communication, arbitration, virtual sequences.
- Connections: TLM, then objections and automatic objections.
- Checking and coverage: SVA, SVA bind, coverage guidelines.
- Registers and reuse: RAL, callbacks, callbacks vs factory.
- Chip level: SoC flow, PSS, and AI in verification.
Sources and further reading
- Siemens EDA, Verification Horizons: The 2026 Functional Verification Study (September 2026)
- Verification Academy: 2026 Functional Verification Study, Executive Findings
- Verification Academy: 2024 IC/ASIC Functional Verification Trend Report
- Semiconductor Engineering: First-Time Silicon Success Plummets (March 2025)
- IEEE 1800.2-2020: Universal Verification Methodology Language Reference Manual
- Accellera: UVM library downloads (2020-3.2 and earlier)
- Accellera: IEEE 1800-2023 SystemVerilog free through the IEEE GET program (March 2024)
- Accellera Board approves UVM-MS 1.0 (February 2025)
- Antmicro: Support for upstream UVM 2017 in Verilator (October 2025)
- HPCwire: Cadence introduces ChipStack AI Super Agent (February 2026)
- Synopsys: AgentEngineer announcement (March 2026)
- Siemens: Questa One Agentic Toolkit (February 2026)
- arXiv 2504.19959: UVM², an automated LLM-aided UVM machine for RTL verification
- DVCon Europe 2025: LLM-based functional coverage generation and auto-evaluation framework
- Verification Academy UVM Cookbook: block-level testbench
- ChipVerify: UVM testbench top
Part of the learning path UVM methodology
One Comment
Comments are closed.